Social media and messaging apps have changed the way businesses connect with customers. People don’t just expect a response — they expect it fast. But keeping up with every message manually isn’t always realistic, especially as inquiries pile up. That’s where Facebook Messenger auto-replies can help. They let businesses respond instantly, answer FAQs, and direct customers to the right resources without needing a human agent to be online 24/7.
In this post, we’ll explore how Facebook Messenger auto-replies work, why they’re a must-have for businesses, and how to craft helpful responses. Plus, we’ll share Facebook page message auto-reply samples you can use for inspiration.
What is an auto-reply on Facebook Messenger?
Auto-reply on Facebook Messenger is a feature that lets businesses quickly and automatically respond to incoming messages. Such replies are an effective way to acknowledge inquiries, share key information, and keep the conversation moving, even when no one is available to reply in real time.
Facebook Messenger auto-replies can provide details like business hours, expected response times, or links to helpful resources.
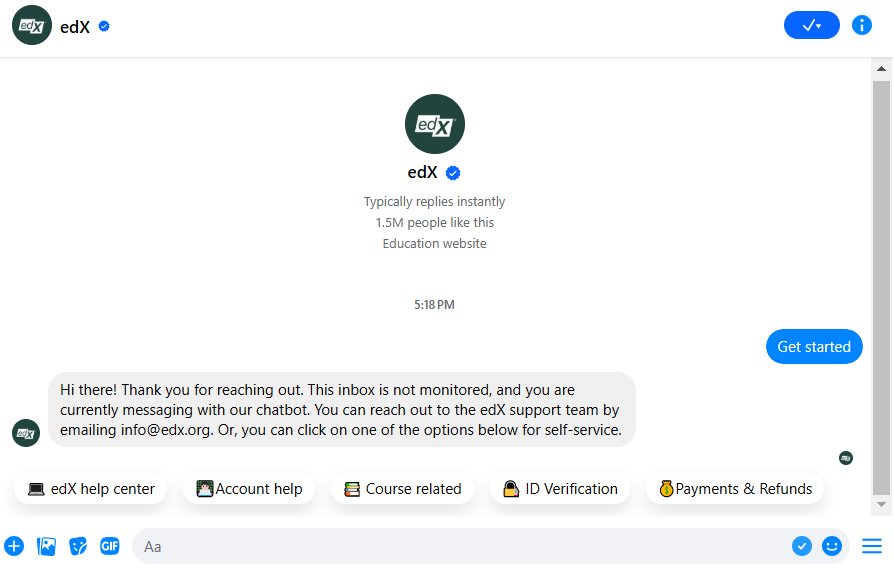 edX sets customer expectations and provides helpful links
Some are designed to personalize messages by including the sender’s name or responding based on specific keywords.
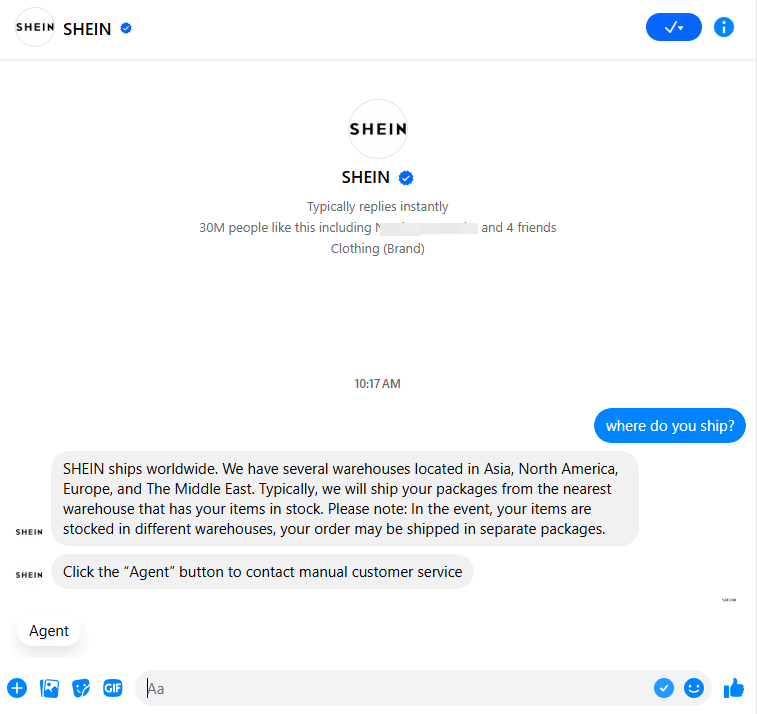 Shein replies automatically based on trigger words in user messages
By handling routine questions and setting clear expectations, businesses can improve customer service response times, reduce manual workload, and keep customers engaged without delays.
Why use Facebook Messenger auto-replies?
Auto-replies on Facebook Messenger help businesses stay responsive without needing to monitor messages around the clock. Here’s how automation can improve customer interactions:
- Instant engagement. With auto-replies, customers get a response immediately, even after business hours, so they’re not left wondering when they’ll hear back. This helps set clear response expectations and, if needed, directs them to alternative contact options for faster assistance.
- Less work for your team. By automatically responding to common customer service requests, businesses can free up time for their team to handle more important requests.
- Improved customer satisfaction. Nobody likes waiting. Quick, automated responses to frequently asked questions, such as delivery terms or pricing, enhance the customer experience and prevent frustration.
- Personalization. Auto-replies can include names and respond based on keywords, making customer interactions more natural.
- On-brand communication. Every customer gets a professional, polished response, which boosts their trust in your business and maintains a consistent brand voice.
- Improved efficiency. Facebook Messenger auto-replies keep conversations flowing smoothly, improve response times, and make it easier to handle high message volumes.
Overall, Facebook Messenger auto-replies are a win-win for both businesses and their audiences. It allows simple questions to be addressed instantly, while customers with more complex requests know exactly when to expect a human response.
Best and worst practices for auto-replies on Facebook Messenger
Setting up Facebook Messenger auto-replies can really take your customer communications to the next level, but to get the best results, it’s important to follow a few key rules.
A well-crafted auto-reply on Facebook Messenger should feel helpful, natural, and aligned with your brand’s voice. Here are some tips to keep in mind:
- Keep them short and sweet. Auto-replies should be concise and easy to understand. Stick to the essential information customers need.
- Make them personal. Adding a personal touch, like addressing users by name, makes interactions feel more natural and engaging.
- Set clear expectations. A Messenger auto-reply should provide value. Let users know when they can expect a response from a human agent so they’re not left wondering.
- Include helpful links. Direct users to support and FAQs pages or relevant services if they need more information while waiting for assistance.
- Use a friendly tone. For any auto-reply on Facebook Messenger, keep the tone warm and conversational to create a more welcoming experience.
- Optimize with keywords. Set up keyword-triggered auto-replies to instantly answer common questions without requiring a human support agent.
- Comply with guidelines. Stay compliant with Facebook’s messaging guidelines and regularly check for updates to avoid any issues.
To ensure your Facebook Messenger auto-replies are helpful, engaging, and aligned with customer expectations, avoid these common mistakes:
- Don’t sound robotic. To keep your automated messages engaging, avoid overly scripted or generic messages.
- Don’t over-promise. If live support isn’t available, be upfront about response times instead of implying instant assistance.
- Don’t ignore follow-ups. Some customers may have additional questions after the first auto-reply. Have a system in place to escalate more complex inquiries.
- Don’t spam users. Avoid sending too many Messenger auto-replies at once, as they can frustrate customers. Limit responses to one or two concise messages.
- Don’t leave users without help. When using auto-replies, it’s important to follow up. Always provide a next step, whether it’s connecting with support, checking an FAQ, or offering an alternative contact option.
- Don’t use generic replies for every inquiry. Tailor responses for different scenarios to ensure a more relevant and helpful experience.
In summary, when using Facebook Messenger auto-replies, focus on providing clear, helpful, and personalized responses to ensure a positive user experience. Try to avoid overly generic or impersonal messages that could frustrate users.
Best Facebook page message auto-reply samples
In this section, we’ll share Messenger auto-reply templates for various purposes. Feel free to use these examples as inspiration or customize them to match your business’ communication style.
Greetings
You can use auto-replies on Facebook Messenger to greet users and set expectations for the conversation. Here are a couple examples:
“Hi there! Thanks for reaching out to us. We’re currently away, but someone will get back to you as soon as possible.”
“Hello and welcome! We’re thrilled to hear from you. Our team is away at the moment but will respond shortly. In the meantime, feel free to tell us how we can help!”
“Hey [Name]! We’re currently unavailable, but your message is important to us. Someone from our team will reply shortly.”
Frequently asked questions
Oftentimes, businesses have a dedicated FAQ section that contains valuable information and can provide instant answers to common questions. Here’s how you can introduce this section to a recipient:
“Hi! Here are some answers to frequently asked questions: [FAQ link]. If you need more assistance, feel free to ask, and we’ll get back to you soon!”
“Thanks for messaging us! You can find our FAQs here: [link]. If your question isn’t answered, we’ll be in touch shortly.”
“Hey [Name]! If you have any urgent questions, our FAQ section might have the answers you need: [link]. Please let us know if you found the information you were looking for!”
Order confirmation
If you use Facebook Shop or a chatbot to collect orders, you can also integrate Facebook Messenger auto-replies to confirm when an order has been successfully placed. Let’s take a look at some examples:
“Thank you for your order, [Name]! We’ve received it and are processing it now. You’ll receive a confirmation email shortly with tracking details. If you have any questions, feel free to ask!”
“Your order has been successfully placed! We’re working on it right now, and you will receive an email with all the details soon. Thank you for choosing us!”
“Order confirmed! We’ve got your order and are getting it ready. You’ll receive a notification once it’s on its way. Let us know if you need any help in the meantime!”
Appointment or reservation confirmation
You can set up auto-replies on Facebook Messenger to confirm an appointment booking or reservation. Additionally, the message can include the cancellation policy or any other essential details.
“Your appointment has been successfully booked! We’re looking forward to seeing you on [date/time]. If you need to make any changes, please let us know.”
“Great news! Your reservation at [Location Name] is confirmed for [date/time]. Please note that we are a cash-free restaurant, and only accept payments via credit or debit card. We appreciate your understanding!”
“Your reservation is now confirmed! 📅 We’ve saved your spot for [date] at [time]. Please note, cancellations must be made 24 hours in advance to avoid a fee. See you soon!”
Support request acknowledgement
Auto-replies can be used to acknowledge customer support requests, especially when processing takes time. You can inform customers that their message has been forwarded to an agent and that they can expect a response within a specific timeframe. For example:
“Thanks for contacting our support team! We’ve received your message and are reviewing it. A team member will get back to you shortly with a solution. We appreciate your patience!”
“We’ve received your inquiry, which has been passed on to a manager. You should hear back from us within 1 hour. Thanks for reaching out, and we’ll be in touch soon!”
“Our team has received your request, and it’s currently being reviewed by a manager. Please provide your email address so we can get back to you with a detailed response. Thank you!”
After-hours response
Facebook Messenger auto-replies can quickly let users know when the team is unavailable and when they can expect a response. Here’s how you can do this:
“[Name], thanks for messaging us! Our team is currently out of the office, but we’ll be happy to assist you during business hours, which are Monday to Friday, 9 AM to 6 PM. We’ll get back to you as soon as we’re available!”
“We appreciate your message! Our team is offline right now, but we’ll get back to you during regular working hours, Monday through Friday. Thank you for your patience!”
“We’ve received your message! Our customer support team is currently offline but will respond within 24 hours. Thank you for your understanding!”
Follow-up reminder
Businesses can also incorporate auto-replies to remind the user of an ongoing task, especially if it’s taking longer than expected. Here are some Facebook page message auto-reply samples:
“Just a reminder, you requested information about [subject]. We’re currently processing it and will get back to you as soon as we have an update. Thank you for your patience!”
“Thanks for reaching out! We’re still working on your request and will follow up with more details soon. Stay tuned!”
“Hi [Name], your order is currently being processed. It’s taking a bit longer than usual, but we’ll update you as soon as it’s ready. We appreciate your patience!”
Thank you
After customer interaction, you can use automated messages to express gratitude for choosing your product or service. Additionally, you can ask them to rate their experience directly in the chat. For instance:
“We appreciate you choosing our company! If you’re happy with your experience, please rate it by typing a number from 1 to 5, where 1 is the worst and 5 is the best. Your feedback is important to us!”
“We’re so glad you chose [product/service]! If you’re satisfied with your experience, please take a moment to rate it. We’d love to hear from you!”
“Thank you for trusting [company name]! We hope everything was just as you expected. Feel free to reach out to us anytime!”
How to set up auto-replies on Facebook Messenger with SendPulse
To create auto-replies on Facebook Messenger, you need a reliable chatbot platform that allows you to automate responses based on user interactions. Let’s explore how to create a chatbot flow in Facebook Messenger using SendPulse.
Create a chatbot
With SendPulse, setting up a Facebook Messenger chatbot is straightforward. After logging into your account, connect the Facebook page you want to use for auto-replies. Once connected, you can set up your chatbot to handle automated responses.
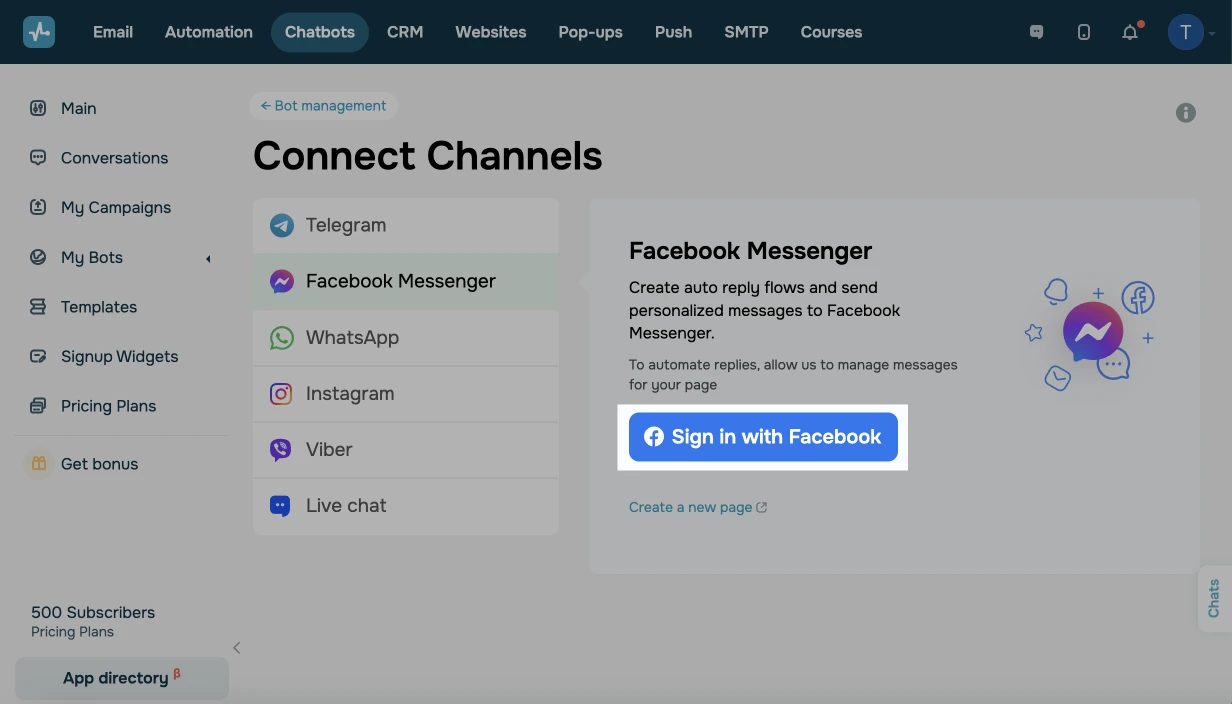 Connecting Facebook Messenger to SendPulse
Outline a chatbot flow
Before enabling auto-replies, it’s essential to plan your chatbot’s structure. A well-organized chatbot flow ensures that users receive relevant responses without unnecessary delays. Start by defining the chatbot’s primary functions, organizing them into sections, and mapping out the connections between elements.
Using our intuitive builder, you can create chatbot flows by selecting pre-set triggers or creating custom ones. There is also a specific “Comment on your post” trigger that allows you to run a flow within 24 hours after a user leaves a comment under any or specific post.
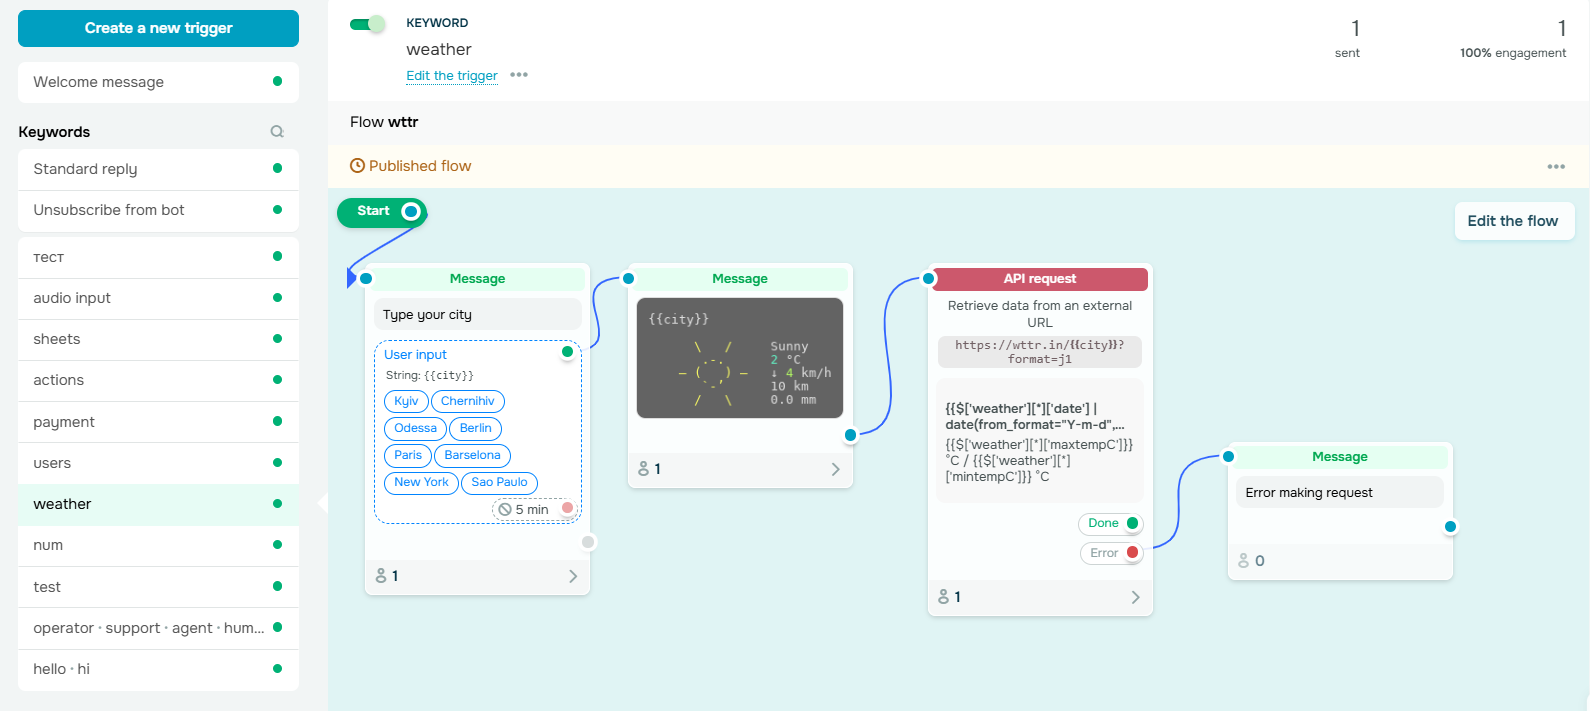 An example of a chatbot flow based on a specific keyword
Add Messenger auto-replies
SendPulse’s “Message” element lets you craft responses using text, images, buttons, and data collection forms. For more advanced automation, the “AI Step” element can analyze customer interactions, process responses, and adjust the conversation based on user behavior.
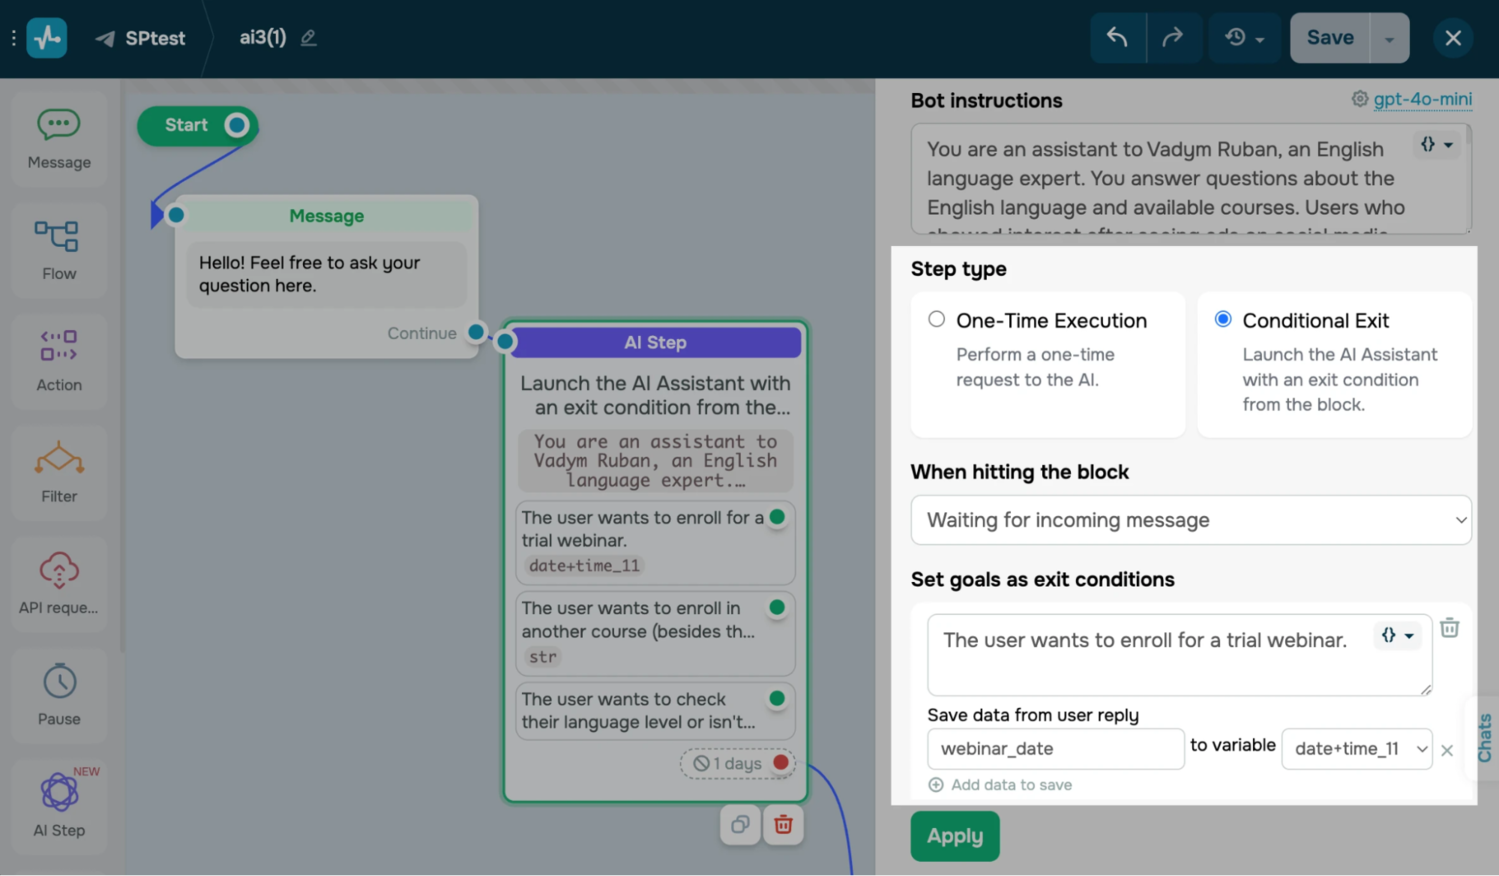 Setting up the “AI step” block
You can also set specific timeframes during which auto-replies will not be sent to make sure your messages only reach users at appropriate times.
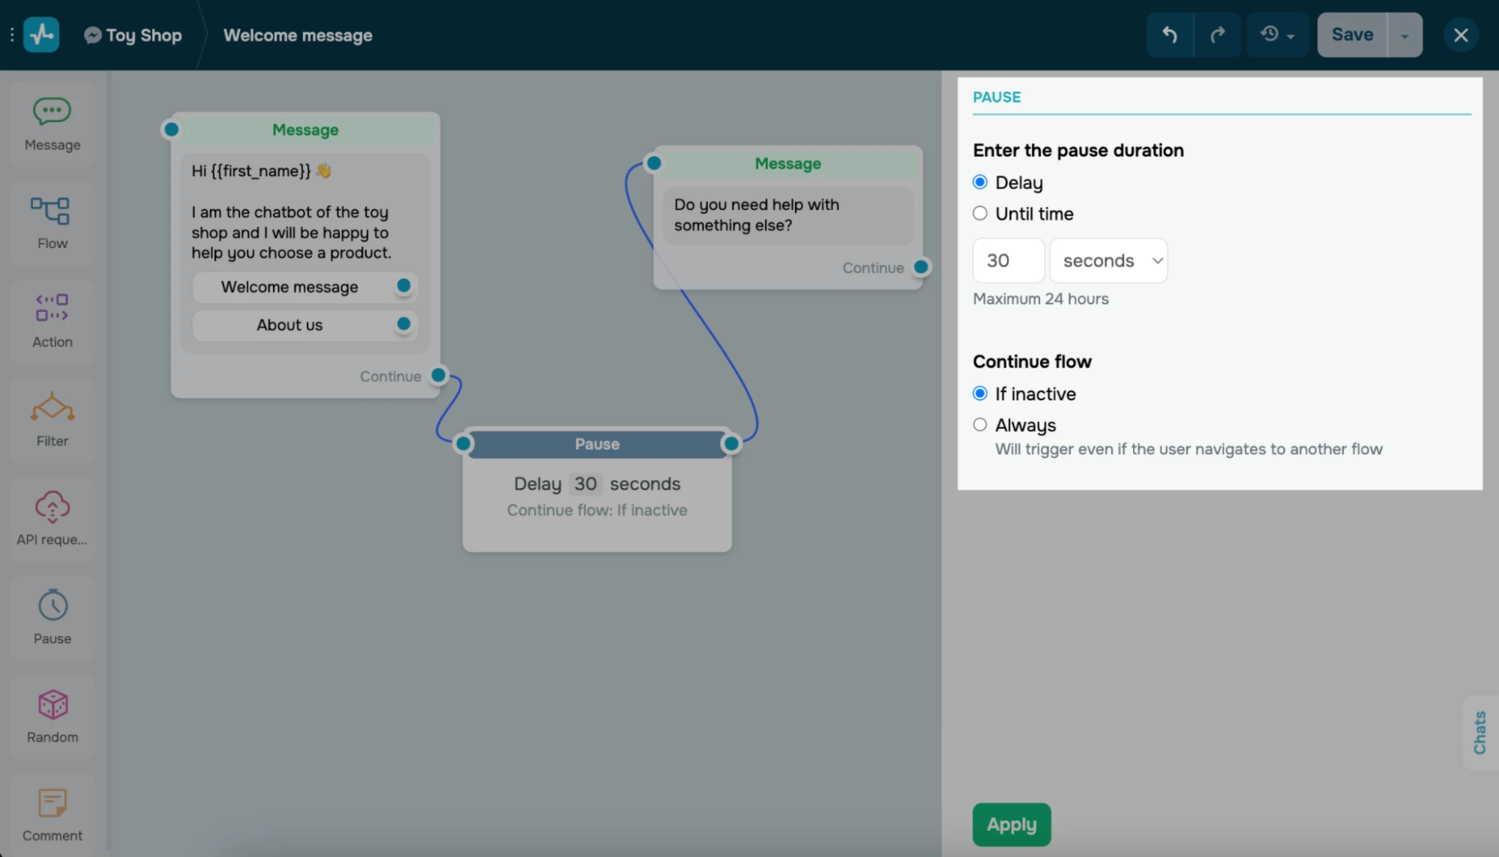 Adding a pause element to a chatbot flow on Messenger
The bottom line
Auto-replies on Facebook Messenger make it easier for businesses to stay connected with customers 24/7. Whether answering FAQs, sharing updates, or setting response expectations, automation ensures users get timely and relevant information without delays.
Setting up auto-replies requires the right tools. SendPulse simplifies this process by allowing businesses to create chatbot flows that trigger automated responses based on user interactions. With the addition of its AI Step feature, businesses can now personalize interactions even further, adapting messages based on customer behavior.
Now is the perfect time to explore SendPulse and see how it can take your Facebook Messenger communications to the next level!