Set up webhooks to receive event notifications
A webhook is a POST request that SendPulse sends to your server when an event happens in your account, such as a new deal or a delivered email. In the Webhooks section, you can set up notifications for the CRM system, Automation, the online course builder, the email service, SMS, and SMTP in one place.
For example, an online store keeps orders in the CRM system and stock in its own accounting system. With a webhook for deal events, the accounting system receives every paid deal within seconds and reserves the goods without manual exports.
Let's talk about how to create and test a webhook, choose events, verify the request signature, and manage your webhooks.
Benefits and use cases
Webhooks push data to your server the moment an event happens, so you don't need to export data manually or poll the API. In the Webhooks section, you can do the following:
- receive events from the CRM system, Automation, the online course builder, the email service, SMS, and SMTP at one URL;
- choose which of the 70 available events each webhook sends;
- add authorization headers and verify the signature of each request, so your server accepts requests from SendPulse only;
- send a test request before real events occur;
- view every request of the last 30 days in the request log and retry failed requests.
Here's how businesses can use webhooks:
- An online store sends the Deal stage changed and Deal payment completed events to its order management system, so a paid deal in the CRM system becomes a confirmed order without manual work.
- A marketing agency collects the Delivered, Email opened, Link in the email clicked, Hard bounces, and Email marked as spam events in its own analytics dashboard to report deliverability to clients.
- An online school receives the Student enrolled in the course and Student completed the course events and notifies its support team in a messaging app when a student enrolls in a course or completes it.
Check the webhook requirements
Before you create a webhook, make sure you have:
| A public HTTPS URL on your server | The URL must start with https://, be reachable from the internet, accept POST requests with a JSON body, and respond with a success status code. SendPulse doesn't support http:// URLs, localhost, or private or internal network addresses. |
| SendPulse IP addresses allowed in your firewall | If your server accepts requests only from allowed IP addresses, add the addresses from the Webhook source IP addresses list in the webhook form. The list can change without notice, so check it when your server stops receiving requests. |
| Access to the Webhooks section | The account owner has access by default. A team member needs the Settings right in the Email and marketing campaigns group of their user role. |
SendPulse sends each event as a dedicated POST request with a JSON object in the body. For the fields of the request body, see View request details.
Webhooks for chatbots and pop-ups are configured separately, in each chatbot or pop-up.
Create a webhook
A webhook links one URL on your server to the set of events you want to receive at this URL. Each webhook in your account needs its own URL.
Enter your webhook URL
Go to Account settings > Webhooks and click Add webhook. If you don't have webhooks yet, click Create webhook.
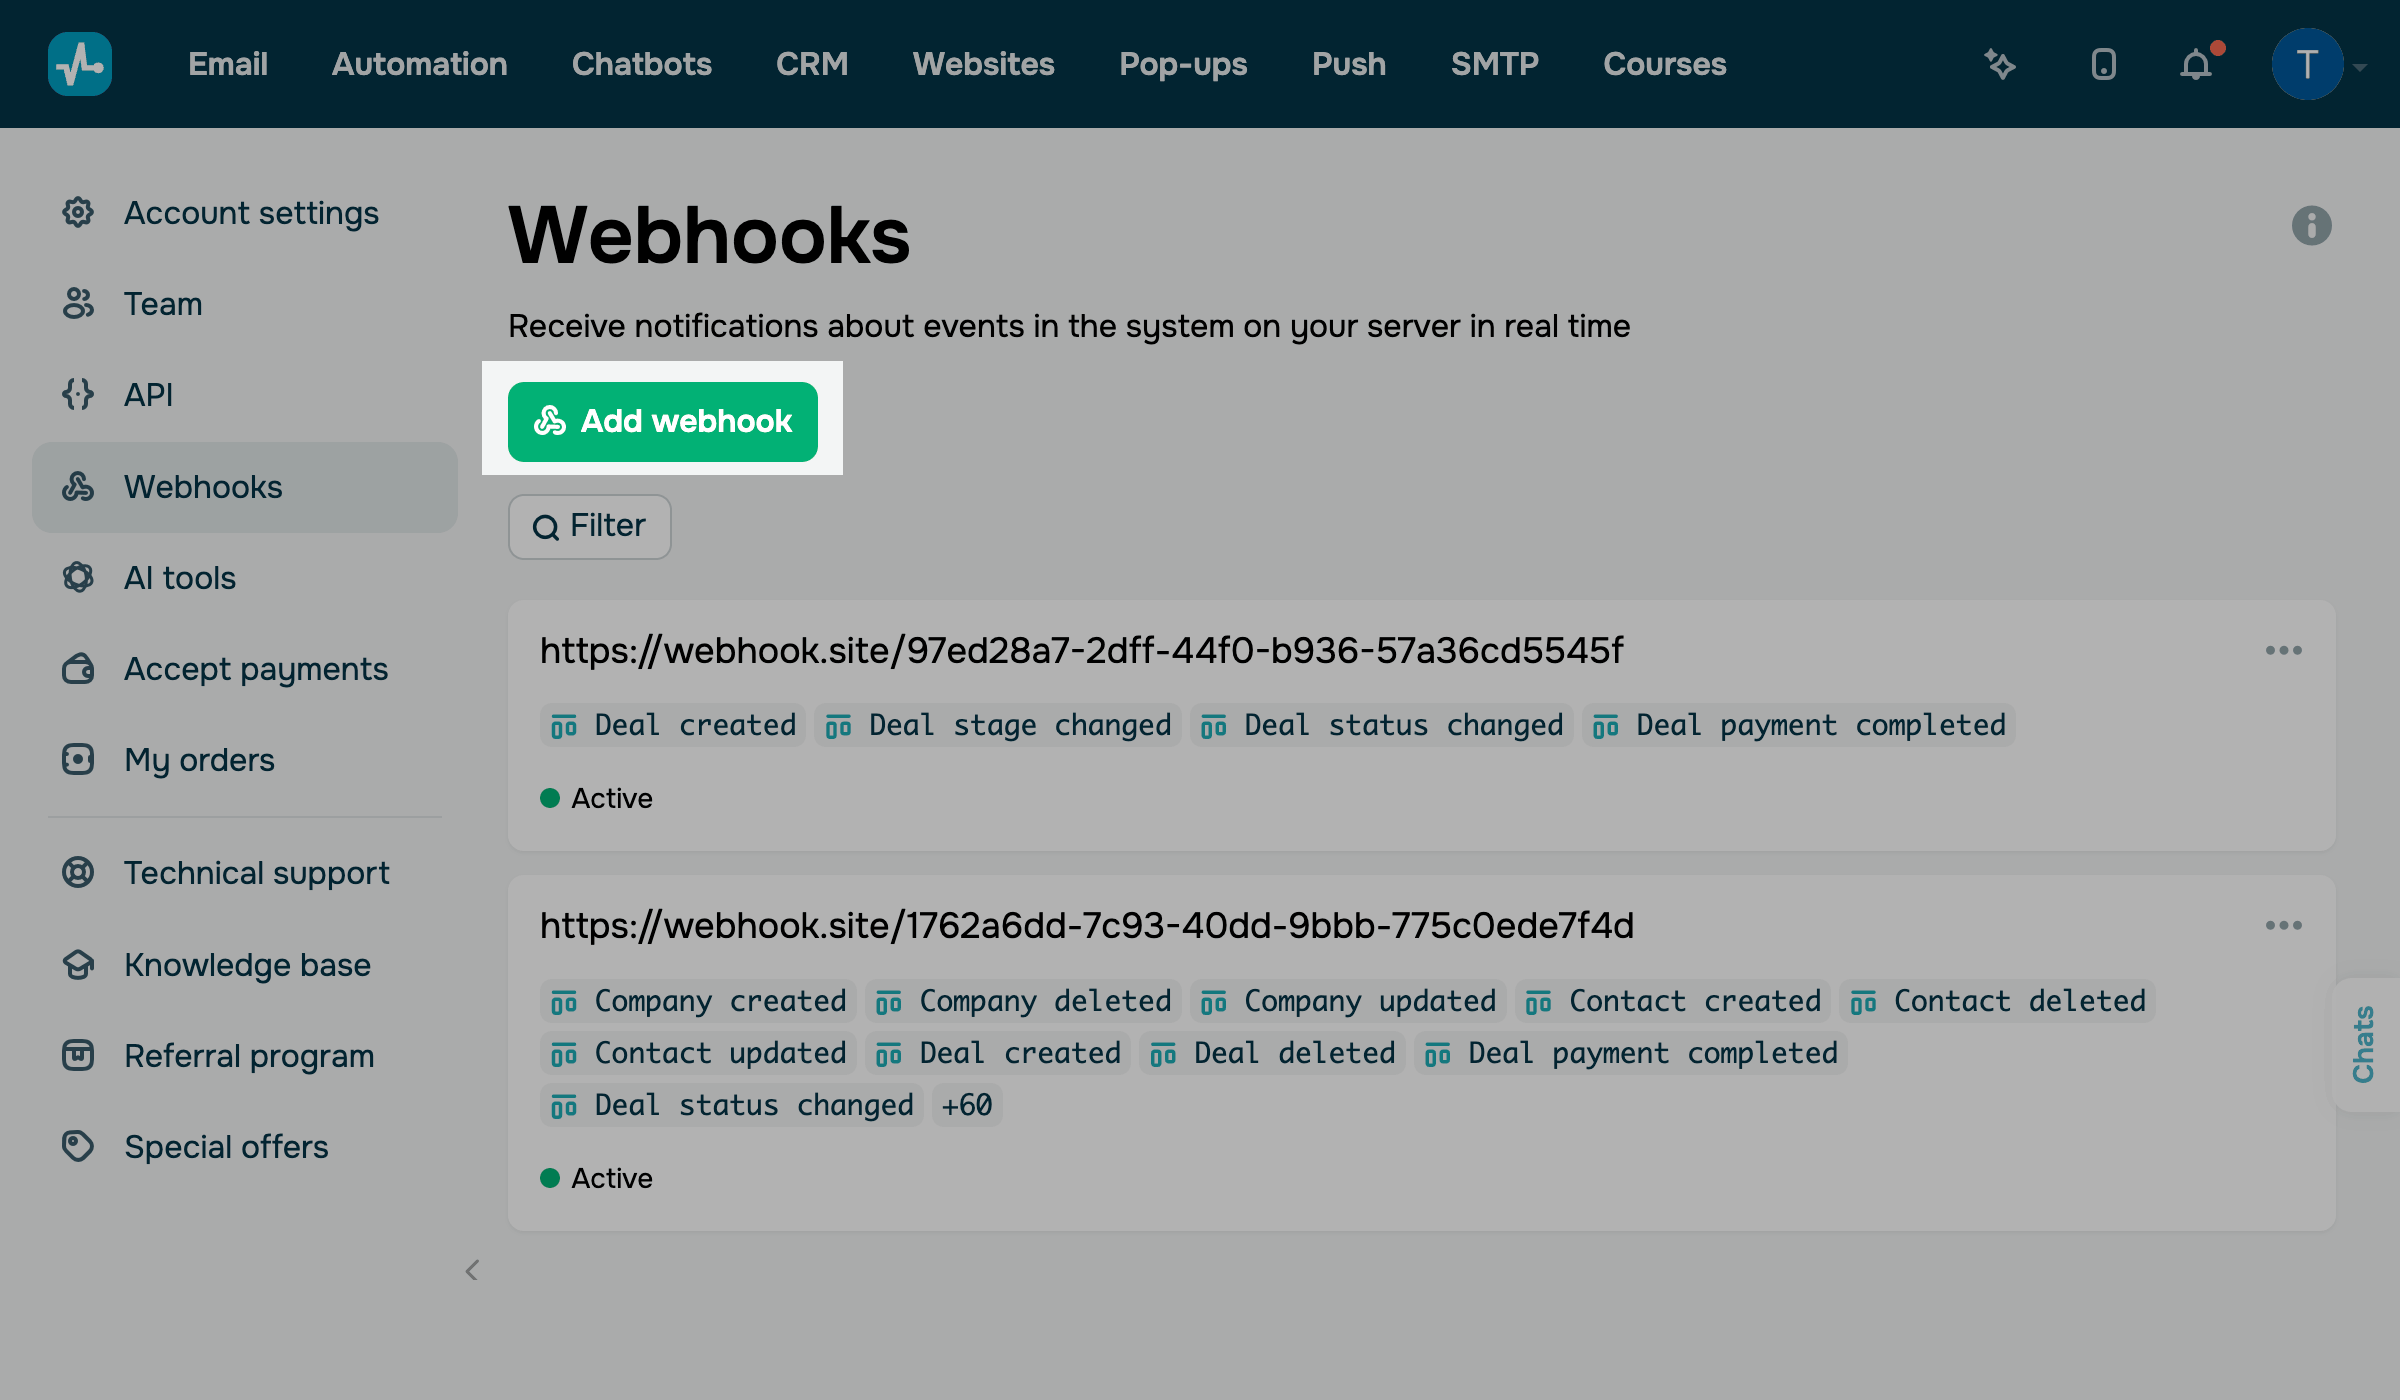
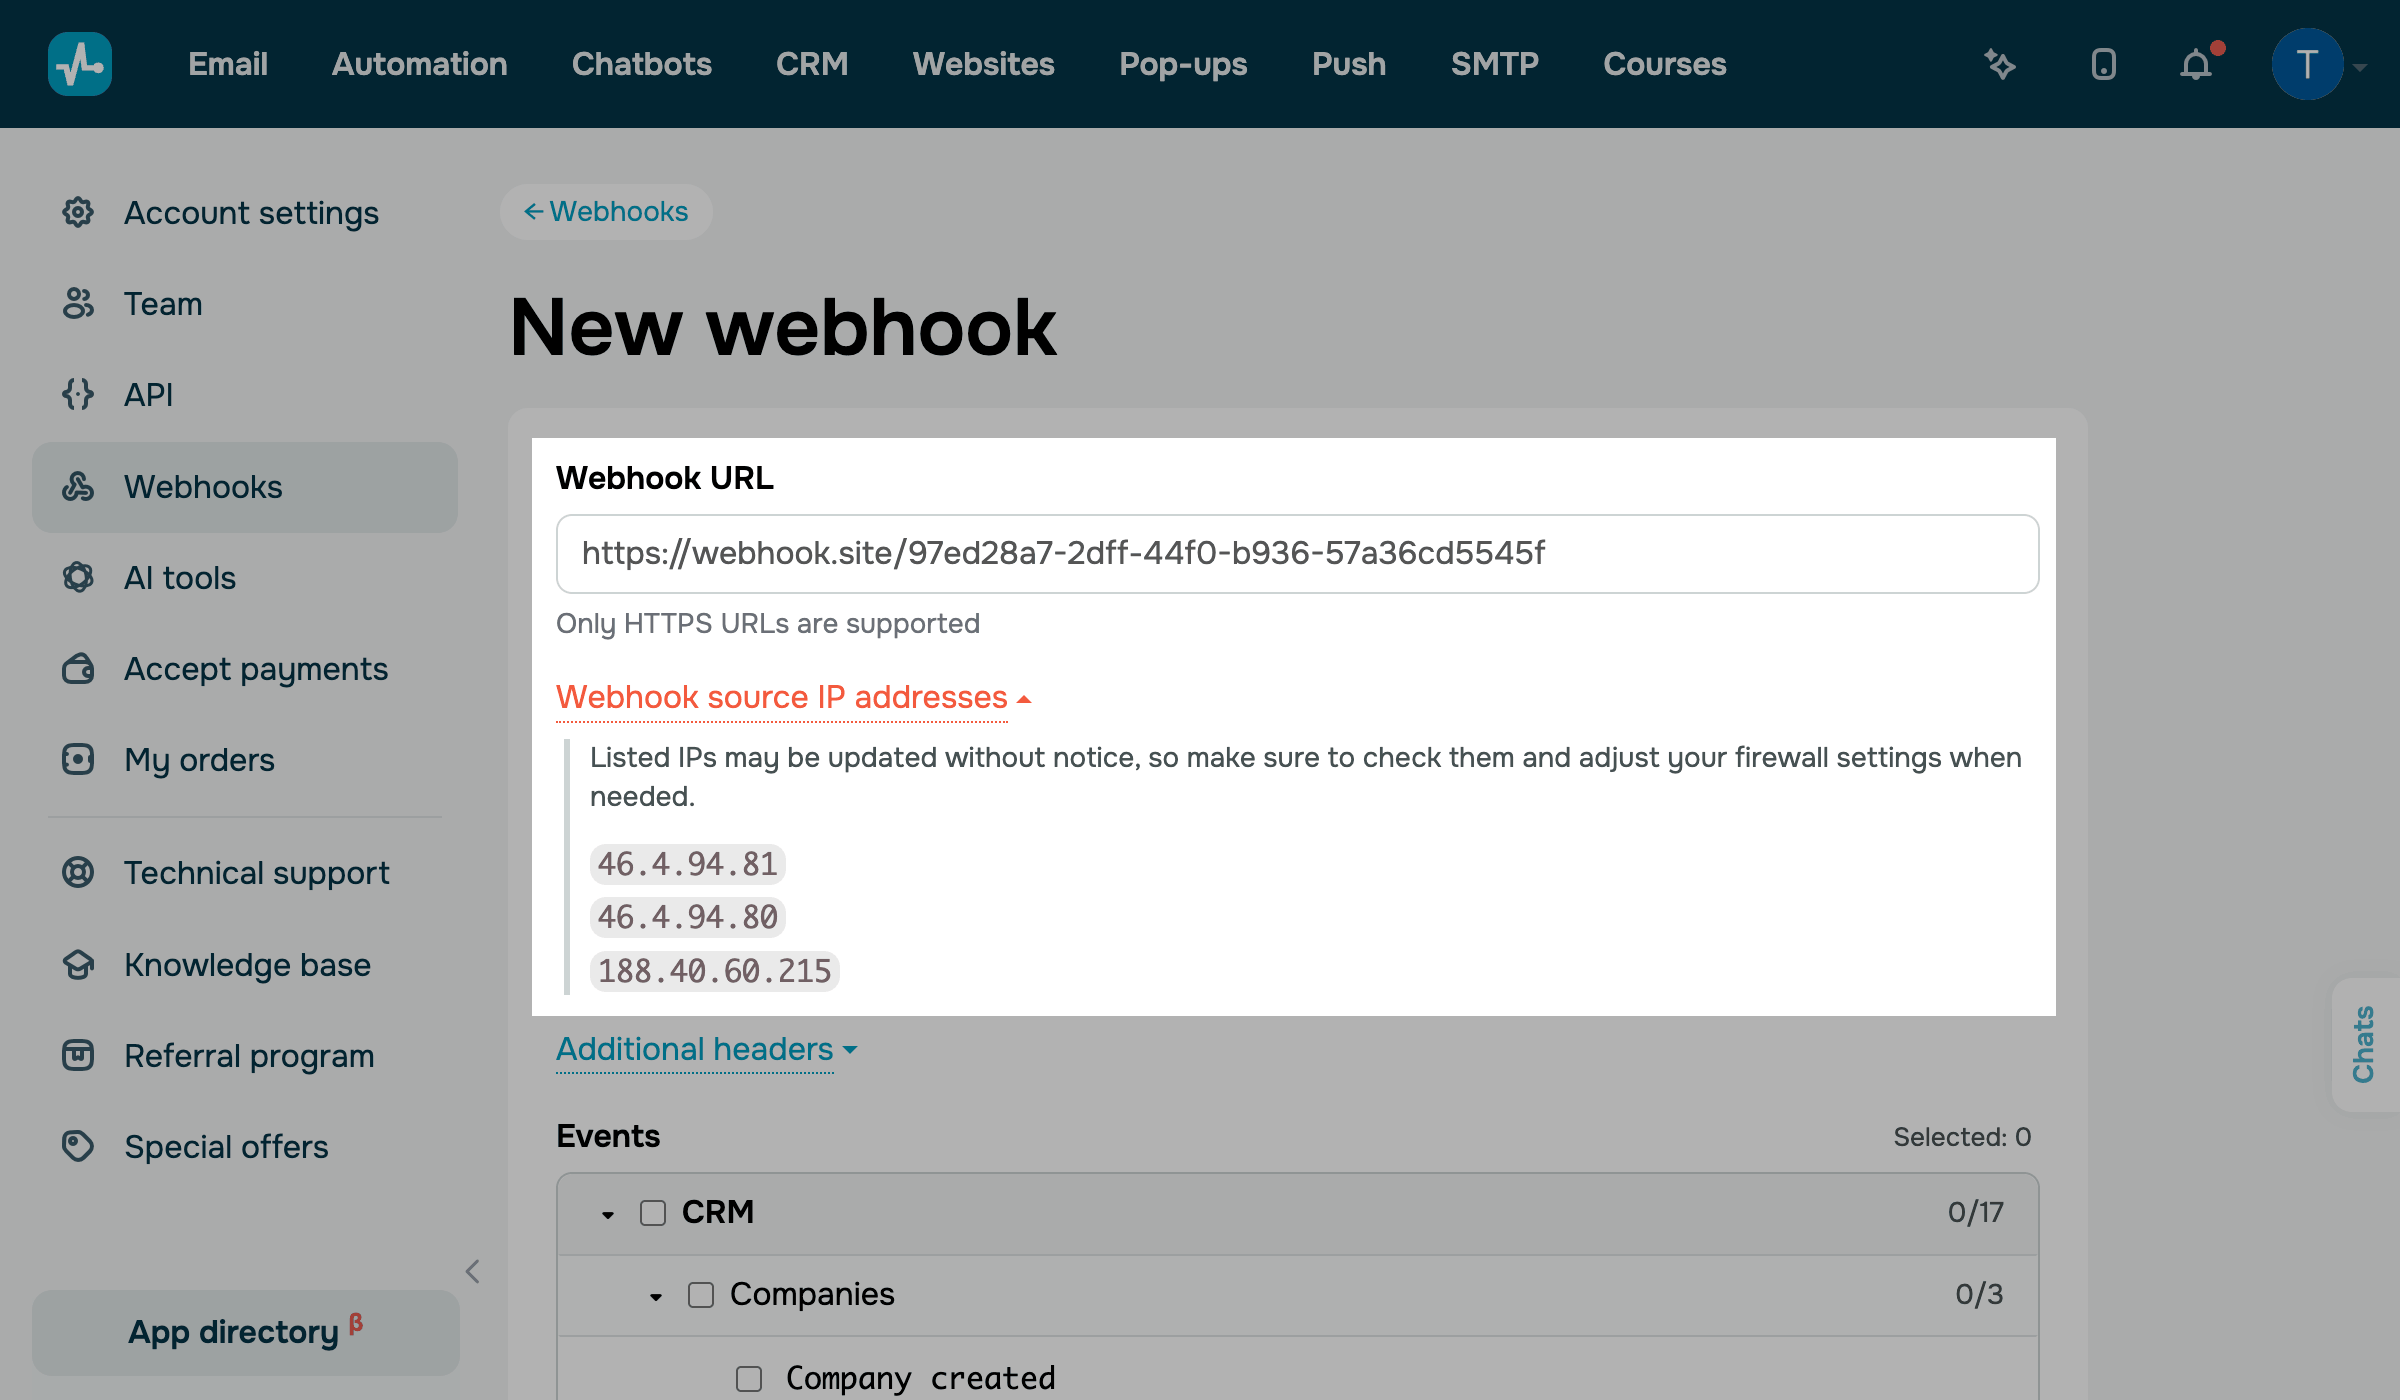
On the New webhook page, in the Webhook URL field, enter the address on your server that will receive the requests, for example, https://api.example.com/webhooks/sendpulse.
To see the IP addresses SendPulse sends requests from, expand the Webhook source IP addresses list. If your server accepts requests only from allowed addresses, add them to your firewall.
Add authorization headers
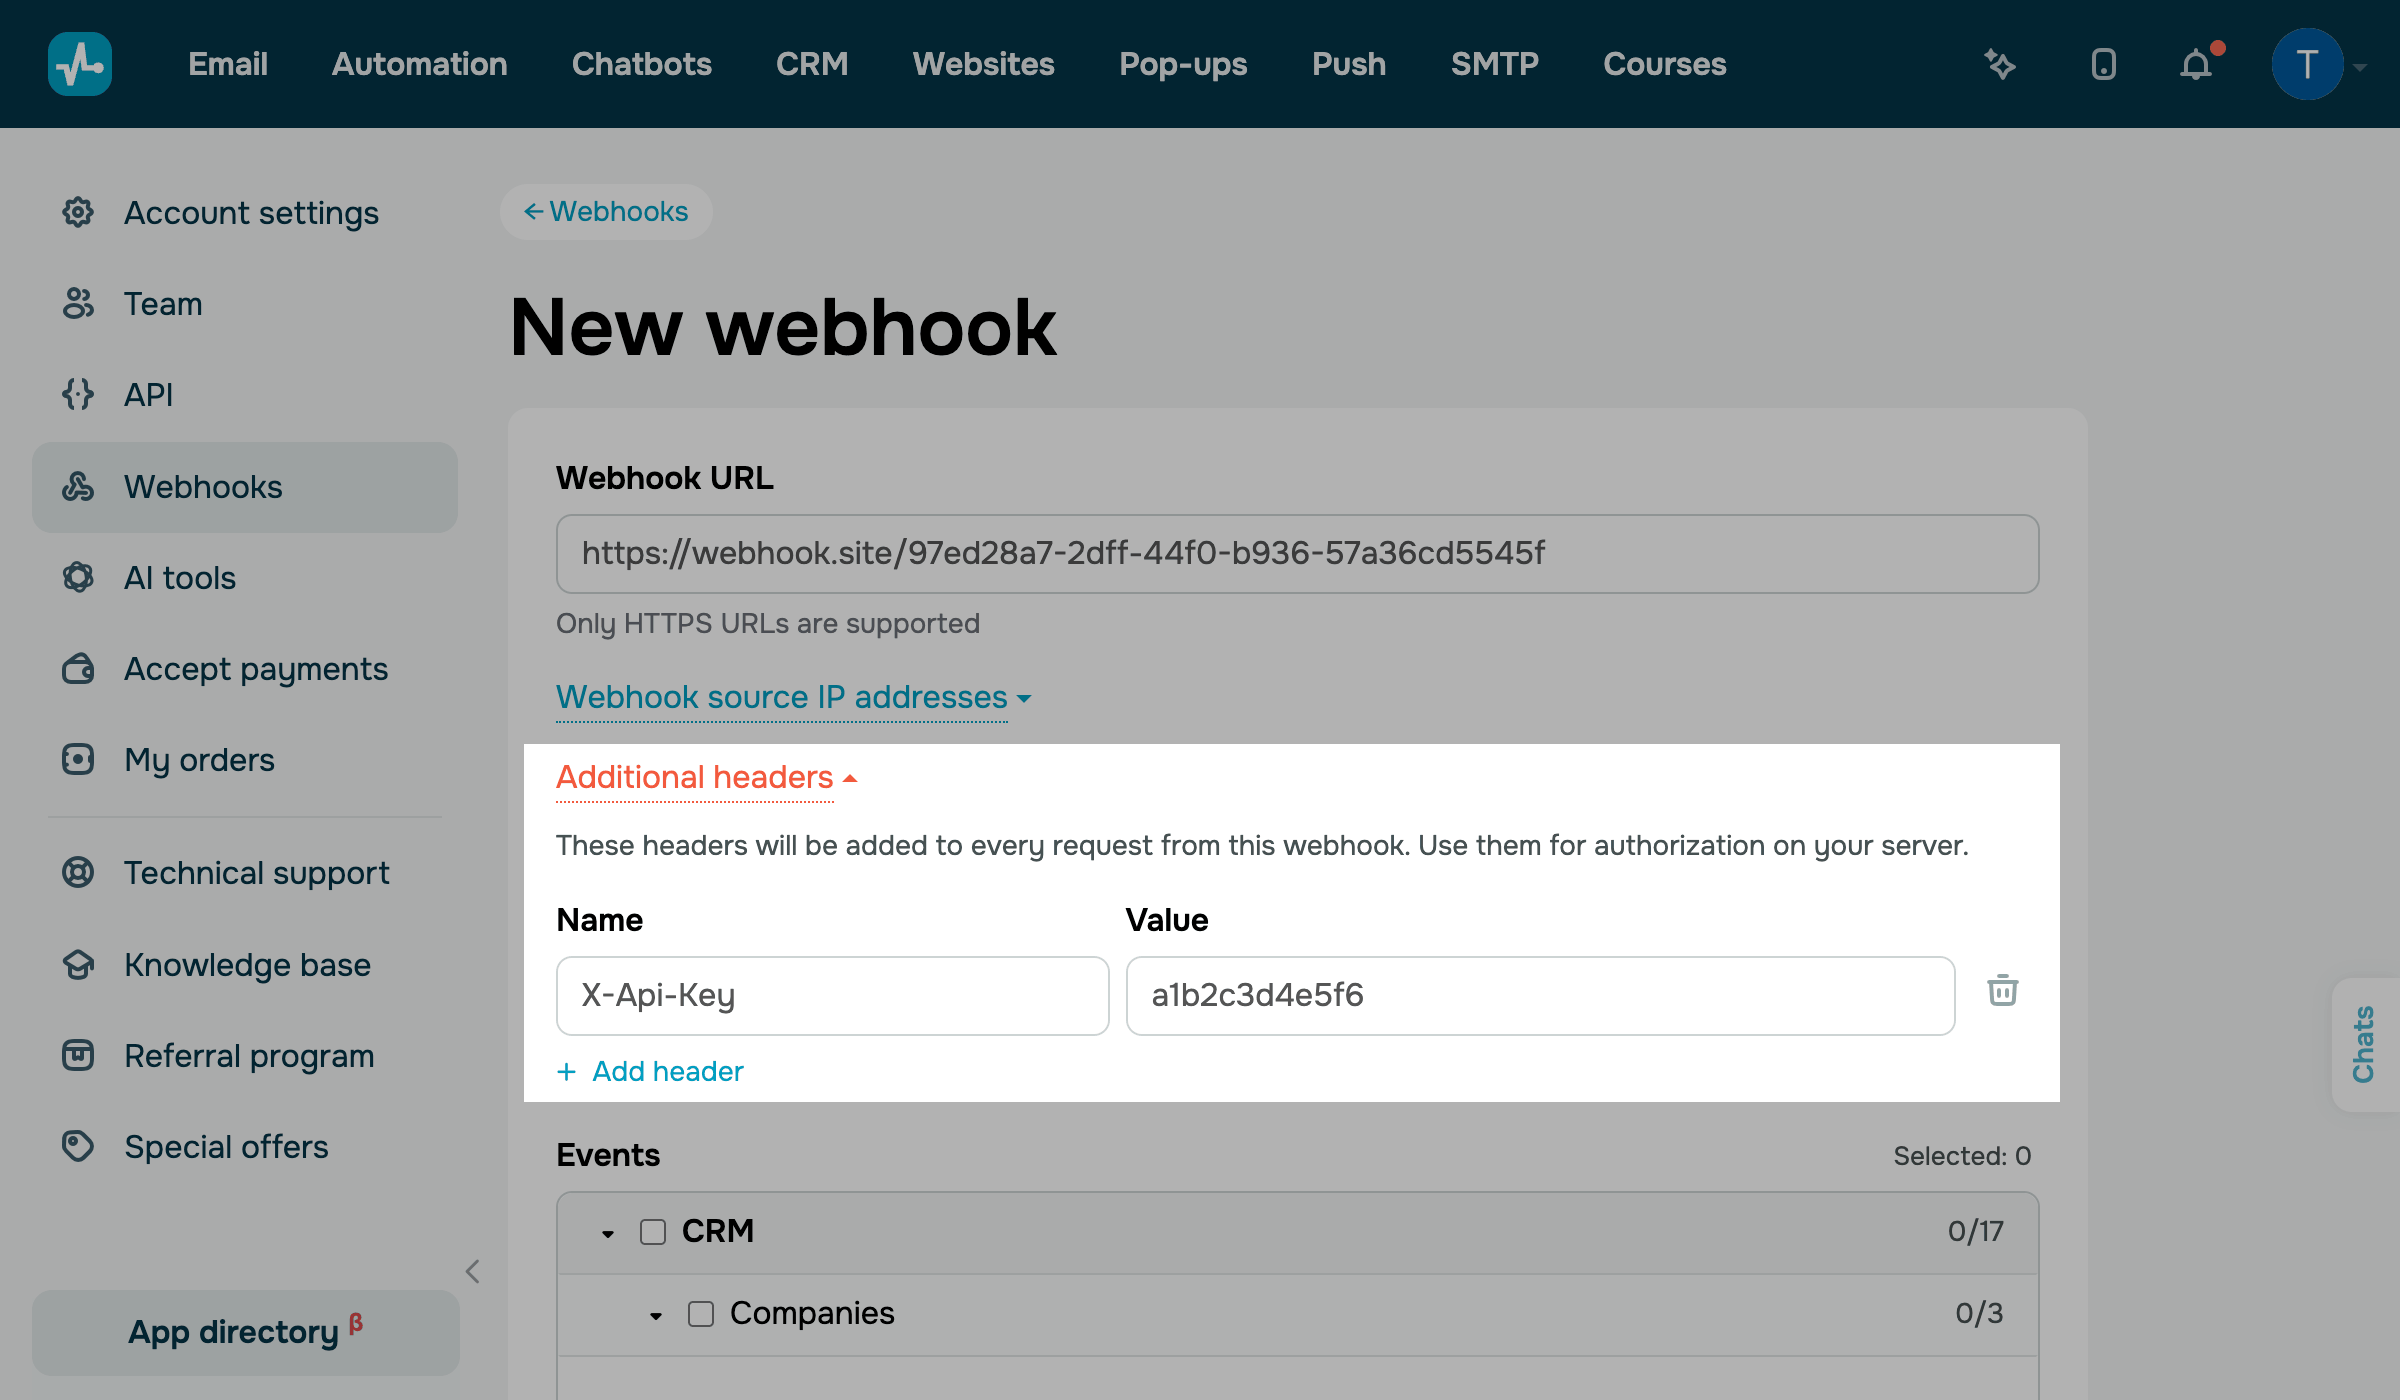
You can also add headers that SendPulse will include in every request from this webhook, such as an Authorization header with a token that your server checks.
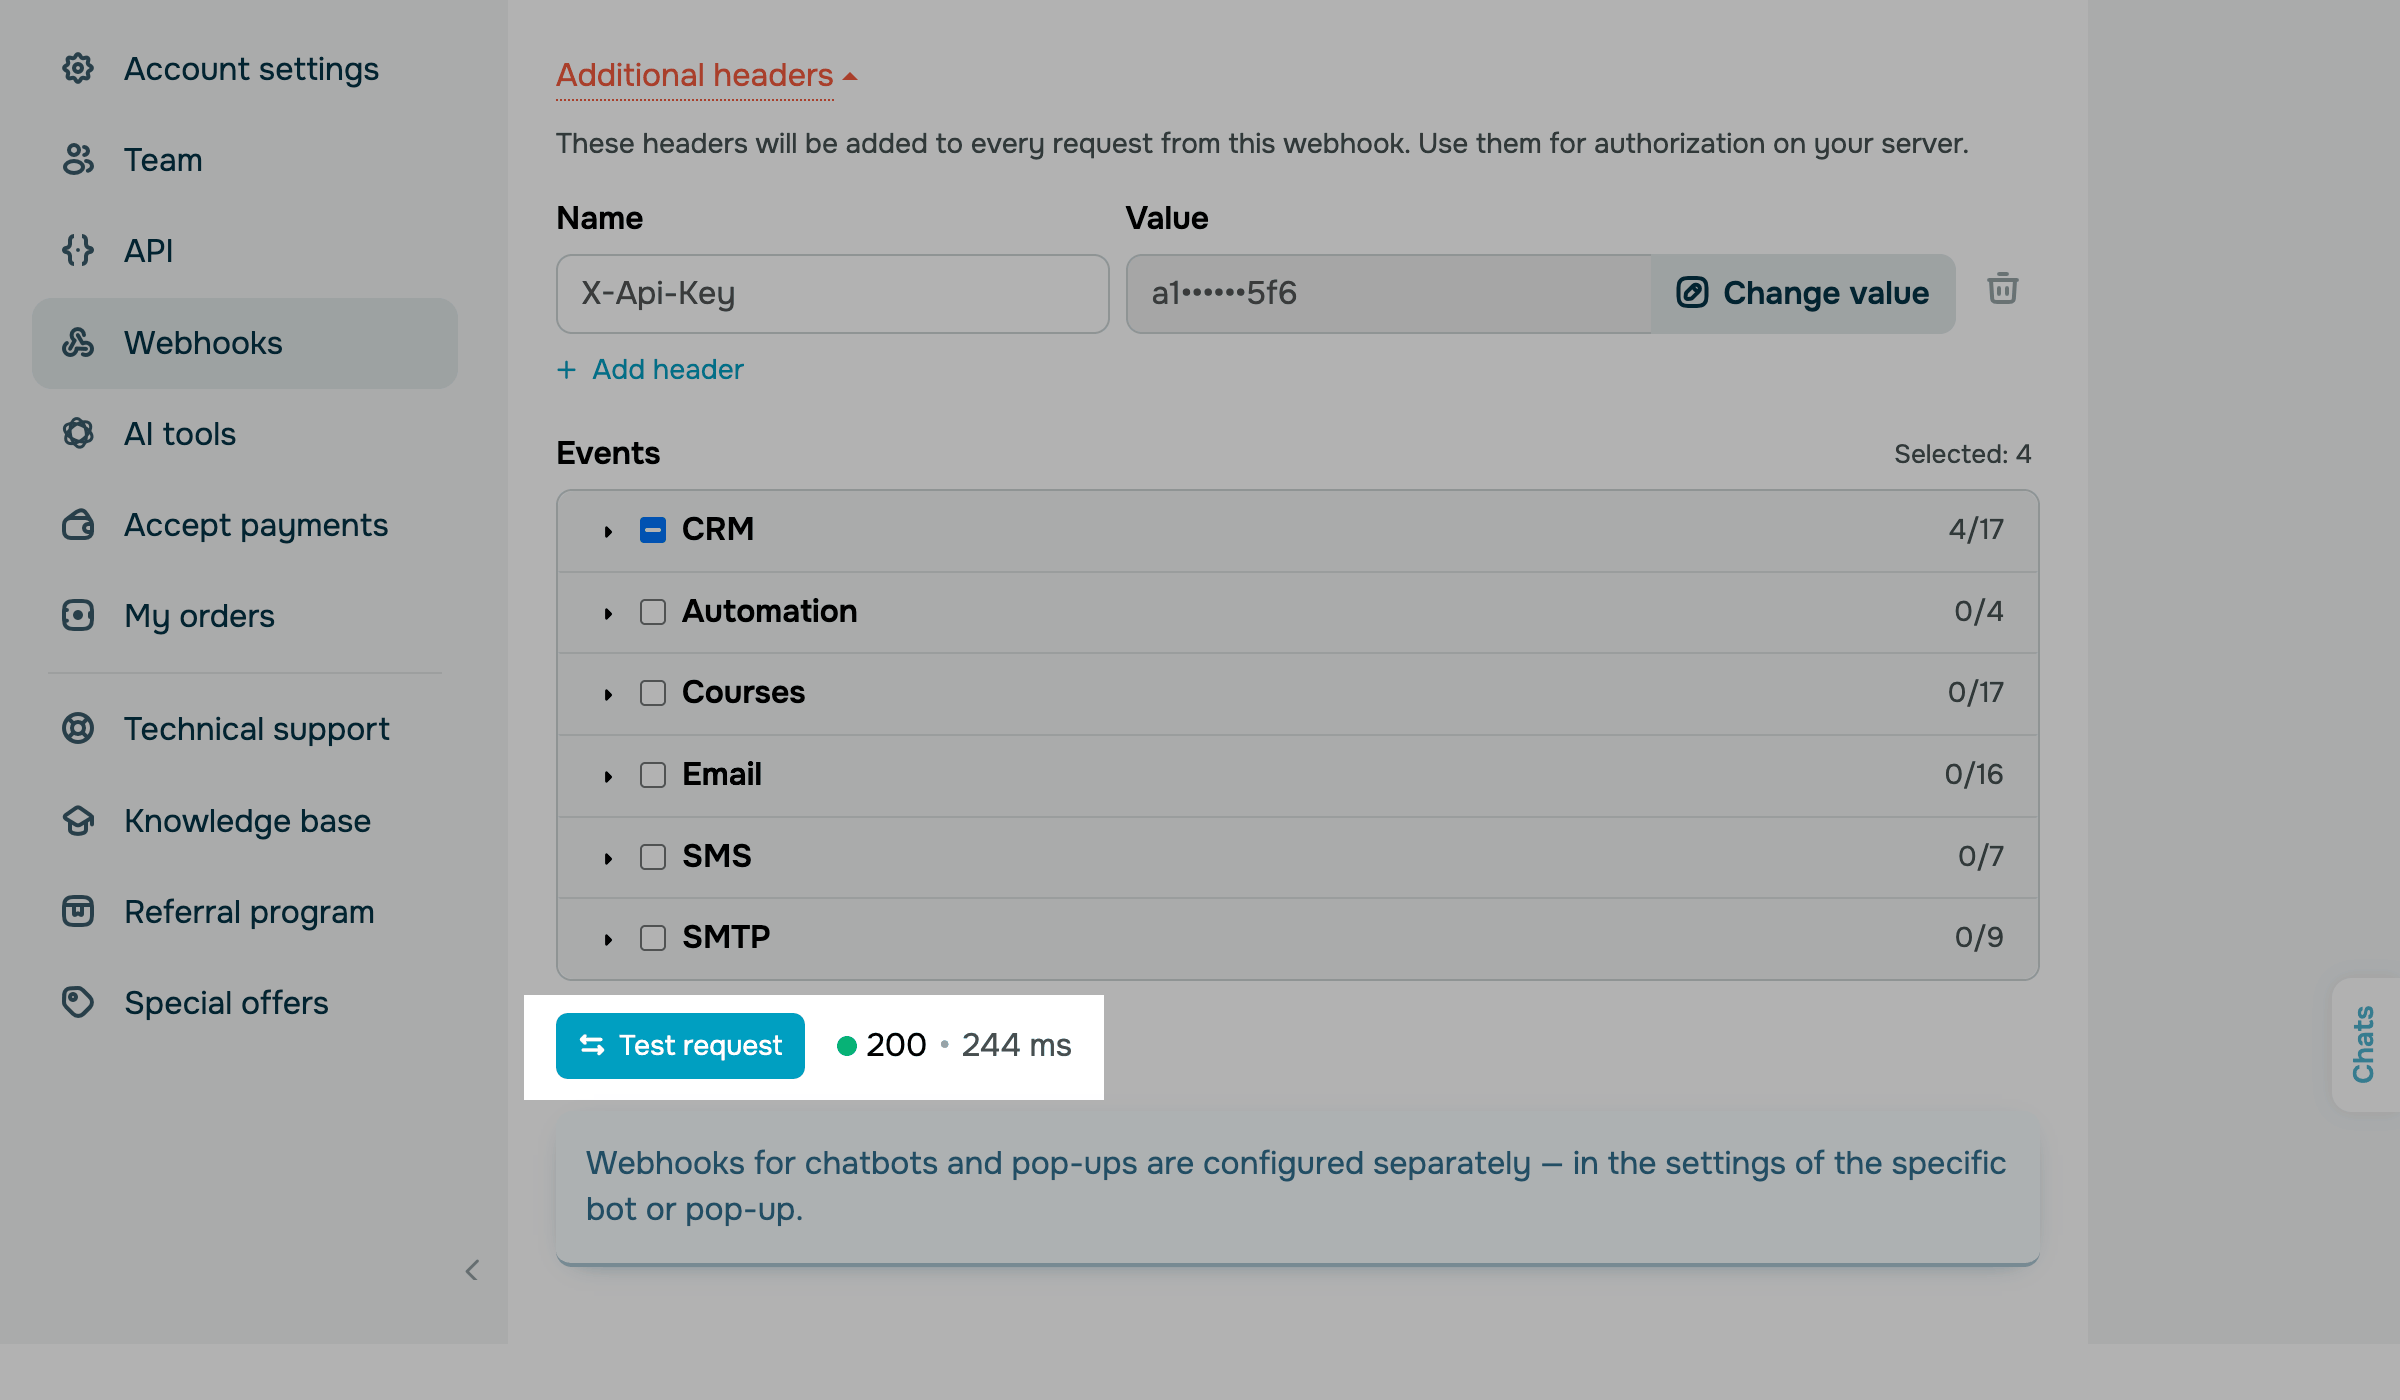
Expand the Additional headers section and click Add header. In the Name field, enter the header name, and in the Value field, enter its value.
To add another header, click Add header again. Each webhook can have up to 10 headers.
To remove a header, click the trash can icon next to it.
A header name can contain 1 to 128 characters allowed in HTTP header names, and a value can contain 1 to 1024 printable ASCII characters. You can't add headers that SendPulse sets itself, such as Content-Type and X-Signature.
Once you save the webhook, SendPulse masks the header values in the form and in the request log. To change a value later, click Change value next to it.
Select events
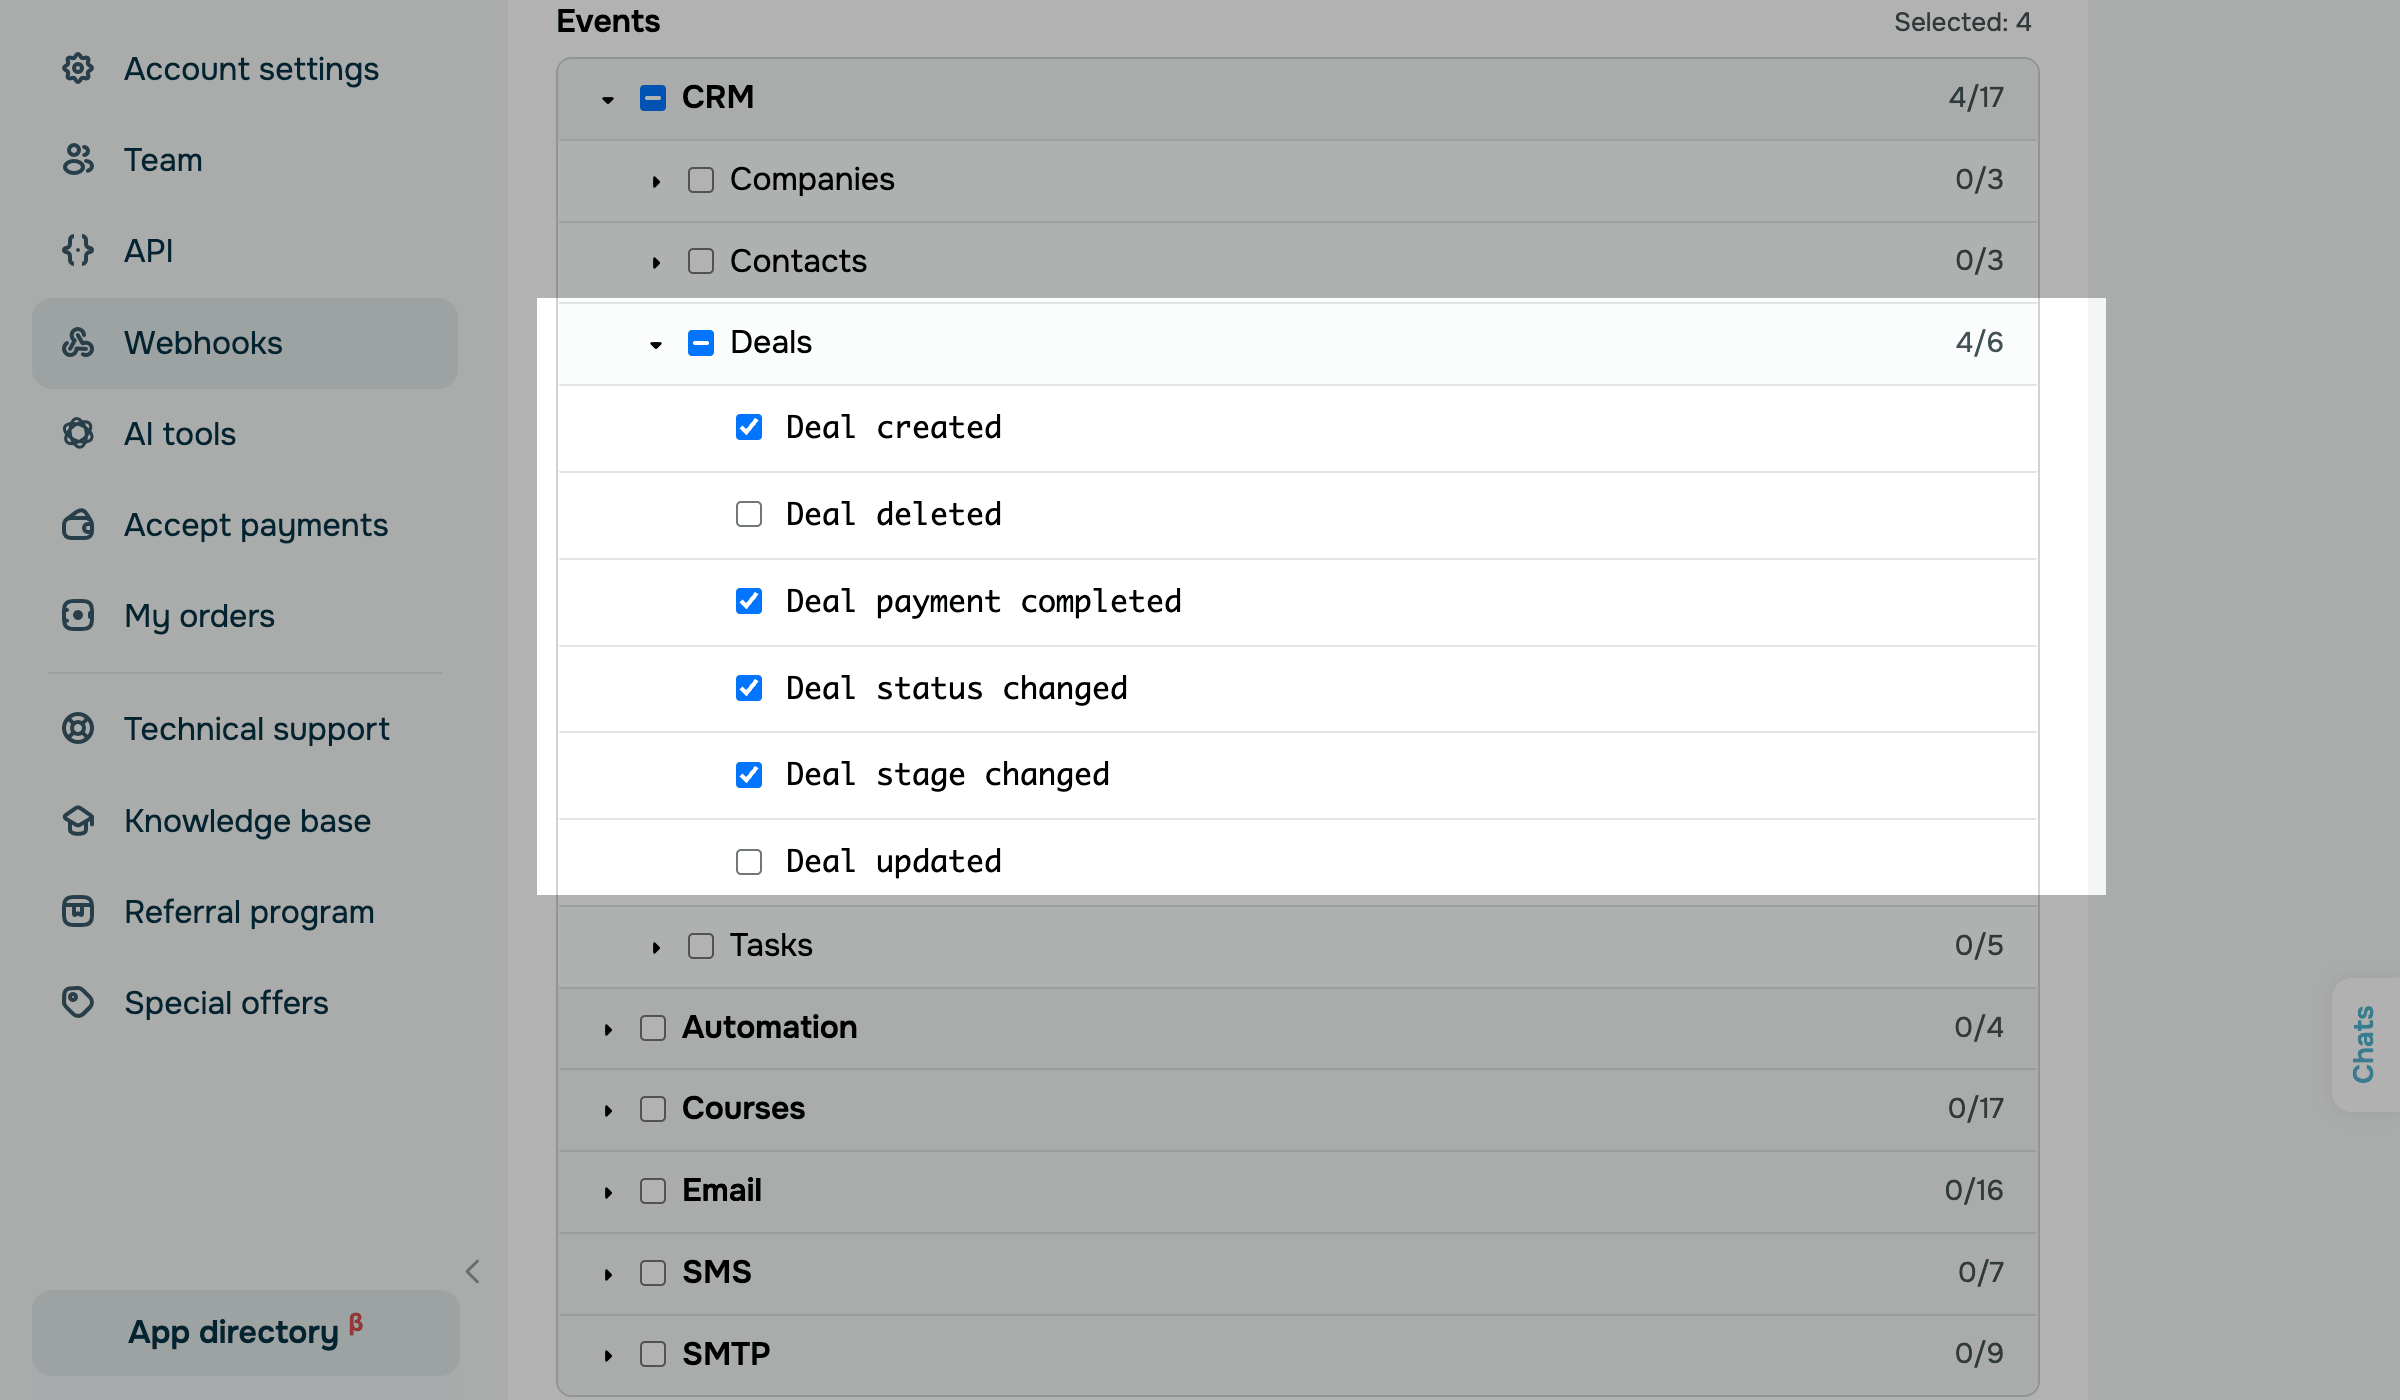
In the Events section, select the events you want to receive. Events are grouped by SendPulse tool (CRM, Automation, Courses, Email, SMS, and SMTP) and, within a tool, by object, such as Deals or Tasks.
To expand a group, click the arrow next to it. Then select the checkbox next to an event.
To select all events of a tool or an object, select the checkbox next to its name.
The counter next to each group shows how many of its events are selected, and the Selected counter shows the total. For all events and their descriptions, see Choose events to receive.
Click Save. If no event is selected, the Select at least one event message appears, and the webhook isn't saved.
The webhook appears in the Webhooks list with the Active status. The webhook is now ready, and SendPulse sends each selected event to your URL as a dedicated POST request, usually within a few seconds after it occurs.
SendPulse also generates a secret key for the webhook. Use this key to verify the request signature.
Choose events to receive
A webhook can send any combination of the following 70 events. The event names match the Events list in the webhook form.
Some events have the same name in different tools. For example, Delivered exists in Email, SMS, and SMTP.
Select the event under the tool you need. The scope field in the request body shows which tool sent the event.
CRM
CRM events cover companies, contacts, deals, and tasks in the CRM system and are grouped into Companies, Contacts, Deals, and Tasks in the form. SendPulse sends the following CRM events:
| Company created | A company is created. |
| Company deleted | A company is deleted. |
| Company updated | Company data is changed. |
| Contact created | A contact is created. |
| Contact deleted | A contact is deleted. |
| Contact updated | Contact data is changed. |
| Deal created | A deal is created. |
| Deal deleted | A deal is deleted. |
| Deal payment completed | A payment for a deal is completed. |
| Deal status changed | The status of a deal changes. |
| Deal stage changed | A deal moves to another stage of the pipeline. |
| Deal updated | Deal data is changed. |
| Task created | A task is created. |
| Task deleted | A task is deleted. |
| Task status changed | The status of a task changes. |
| Task stage changed | A task moves to another stage. |
| Task updated | Task data is changed. |
Automation
Automation events cover flows and the emails sent from them. SendPulse sends the following Automation events:
| Automation email delivered | An email sent from a flow is delivered to the contact. |
| Automation email opened | The contact opens an email sent from a flow. |
| Automation flow started | A contact starts a flow. |
| Variable updated via Automation | A flow changes a contact variable value. |
Courses
Courses events cover courses, students, forms, and lessons in the online course builder. In the form, they are grouped into Courses and Students; Form submitted and Lesson created are listed on their own. SendPulse sends the following Courses events:
| Course created | A course is created. |
| Course deleted | A course is deleted. |
| Course launched | A course is launched. |
| Student paid for the course | A student pays for a course. |
| Course updated | Course data is changed. |
| Student received a certificate | A student receives a certificate. |
| Student completed a form | A student fills in a form. |
| Student completed a lesson | A student completes a lesson. |
| Student completed the course | A student completes a course. |
| Student deleted | A student is deleted. |
| Student invited to the course | A student is invited to a course. |
| Student registered | A new student registers. |
| Student enrolled in the course | A student enrolls in a course. |
| Student started a lesson | A student starts a lesson. |
| Student data updated | Student data is changed. |
| Form submitted | A form is submitted. |
| Lesson created | A lesson is created. |
Email events cover subscribers, tags, and email campaigns in the email service. In the form, tag events are grouped under Tags. SendPulse sends the following Email events:
| Tag added | A tag is added. |
| Tag created | A tag is created. |
| Tag deleted | A tag is deleted. |
| Tag linked | A tag is assigned to a subscriber or a mailing list. |
| Tag unlinked | A tag is removed from a subscriber or a mailing list. |
| Tag updated | A tag is updated, for example, renamed. |
| Subscriber deleted from the list | A subscriber is deleted from a mailing list. |
| Delivered | A campaign email is delivered to a subscriber. |
| Hard bounces | A campaign email isn't delivered because of a permanent error, such as a nonexistent email address. |
| New subscriber | A new subscriber is added to a mailing list. |
| Email opened | A subscriber opens a campaign email. |
| Link in the email clicked | A subscriber clicks a link in a campaign email. |
| Soft bounces | A campaign email isn't delivered because of a temporary error, such as a full inbox. |
| Email marked as spam | A subscriber marks a campaign email as spam. |
| Campaign status changed | The status of a campaign changes, for example, when sending starts. |
| Subscriber unsubscribed | A subscriber unsubscribes. |
SMS
SMS events cover SMS campaigns, message delivery, and sender names. In the form, campaign events are grouped under Campaigns. SendPulse sends the following SMS events:
| Campaign under moderation | An SMS campaign is sent for moderation. |
| Campaign rejected | A moderator rejects an SMS campaign. |
| Delivered | An SMS is delivered to the recipient. |
| Sender status changed | The status of a sender name changes. |
| Sent | An SMS is sent to the recipient. |
| Not delivered | An SMS isn't delivered to the recipient. |
| Unsubscribed | A recipient unsubscribes using the link in an SMS. |
SMTP
SMTP events cover transactional emails sent through SMTP or the API. SendPulse sends the following SMTP events:
| Click on a link | The recipient clicks a link in the email. |
| Delivered | The email is delivered to the recipient. |
| Hard bounces | The email isn't delivered because of a permanent error, such as a nonexistent email address. |
| Open | The recipient opens the email. |
| Resubscribed | A recipient who unsubscribed earlier subscribes again through the Resubscribe a recipient API method. |
| Soft bounces | The email isn't delivered because of a temporary error, such as a full inbox or a recipient mail server issue. |
| Marked as spam | The recipient marks the email as spam and unsubscribes. |
| Not delivered | The email isn't delivered to the recipient. |
| Unsubscribed | The recipient unsubscribes from further emails. |
Verify the request signature
SendPulse signs every request with the secret key of the webhook, so your server can reject forged requests. SendPulse generates the key when you save the webhook.
To get the key, in the Webhooks list, click the three dots next to the webhook and select Edit. In the Secret key field, click the eye icon to show the key and the copy icon to copy it.
Store the key on your server, never in client-side code.
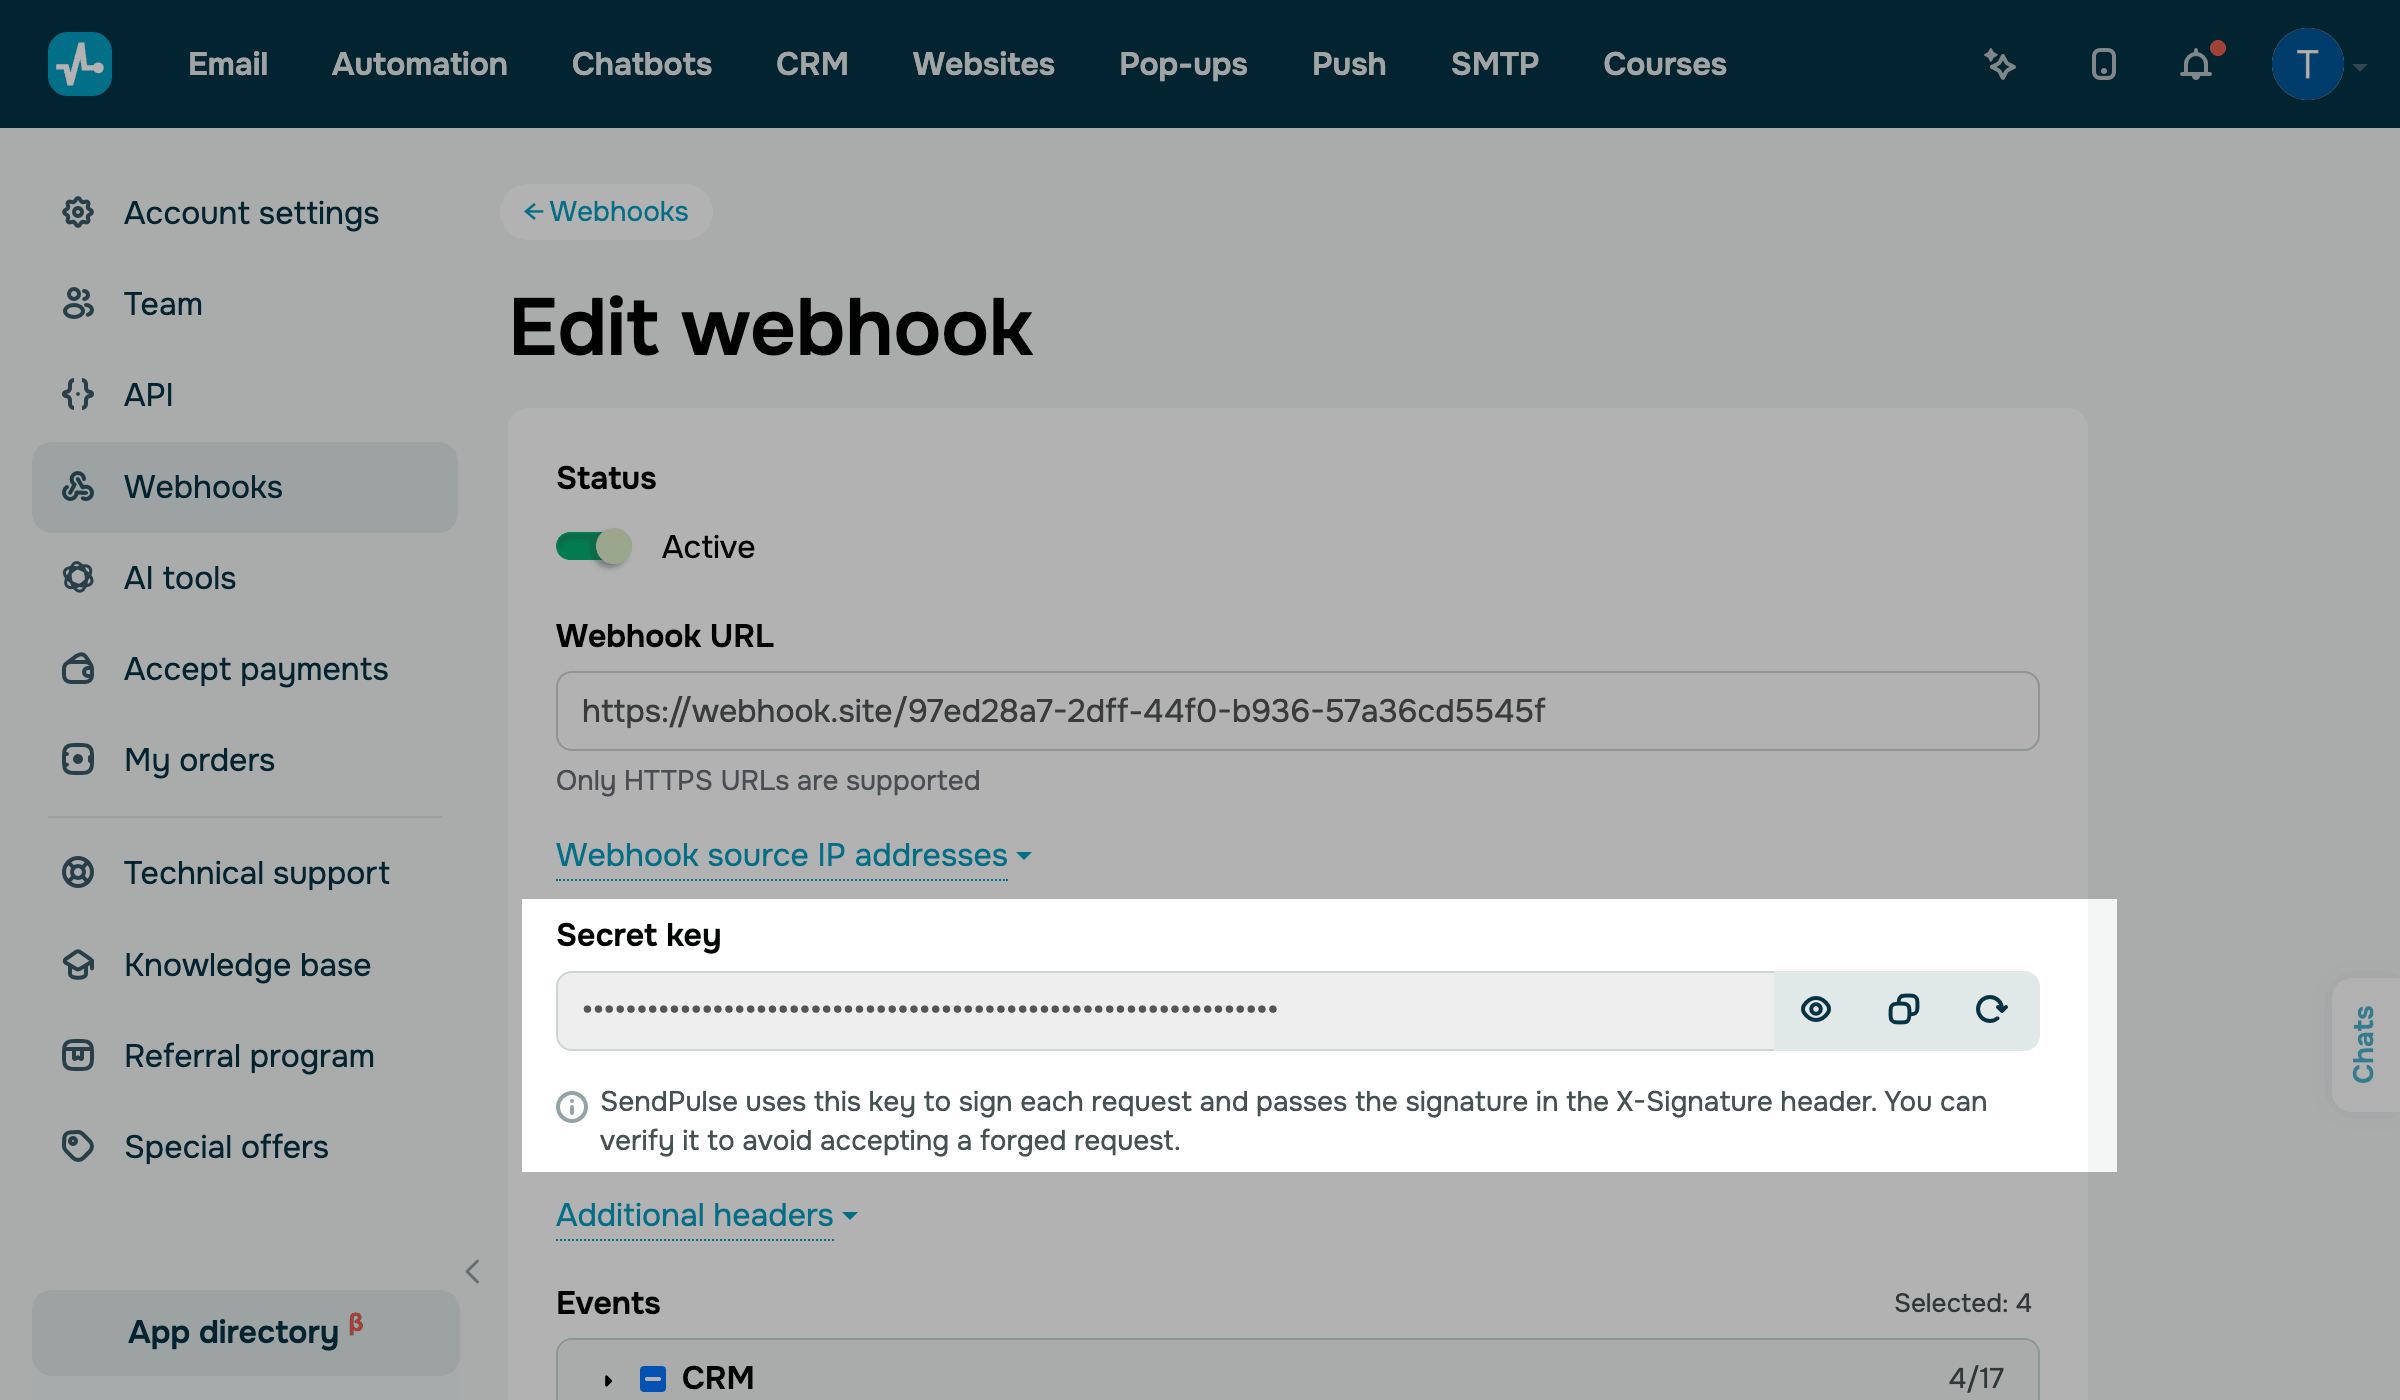
If the key leaks, in the Secret key field, click the regenerate icon. SendPulse replaces the key immediately, without confirmation, and signs the next request with the new key, so update the key on your server right away.
To verify a request, calculate an HMAC-SHA256 hash of the raw request body with the secret key as a text string. Encode the hash as a lowercase hexadecimal string and compare it with the X-Signature header value, sent as sha256=<hash>.
Calculate the hash over the body exactly as you received it, before you parse the JSON. A parsed and re-serialized body gives a different hash.
Send a test request
Before real events occur, check that your server accepts requests from SendPulse.
To send a test request, in the Webhooks list, click the three dots next to the webhook and select Edit. On the Edit webhook page, click Test request under the Events list.
SendPulse sends your webhook URL a POST request with the test event type, no event data, your additional headers, and the signature. Next to the button, you can see the status code your server returned and the response time, such as 200 · 244 ms.
A green dot marks a successful request, and a red dot marks an error, for example, 405 · 87 ms.
If the request fails, fix your server and click Test request again.
The Test request button appears only for a saved webhook. Test requests don't appear in the request log.
For common causes of the request failing, see Troubleshoot webhook issues.
Manage your webhooks
The Webhooks section shows all webhooks of your account as cards. Each card shows the webhook URL, the selected events as tags with the tool icon, and Active or Inactive status.
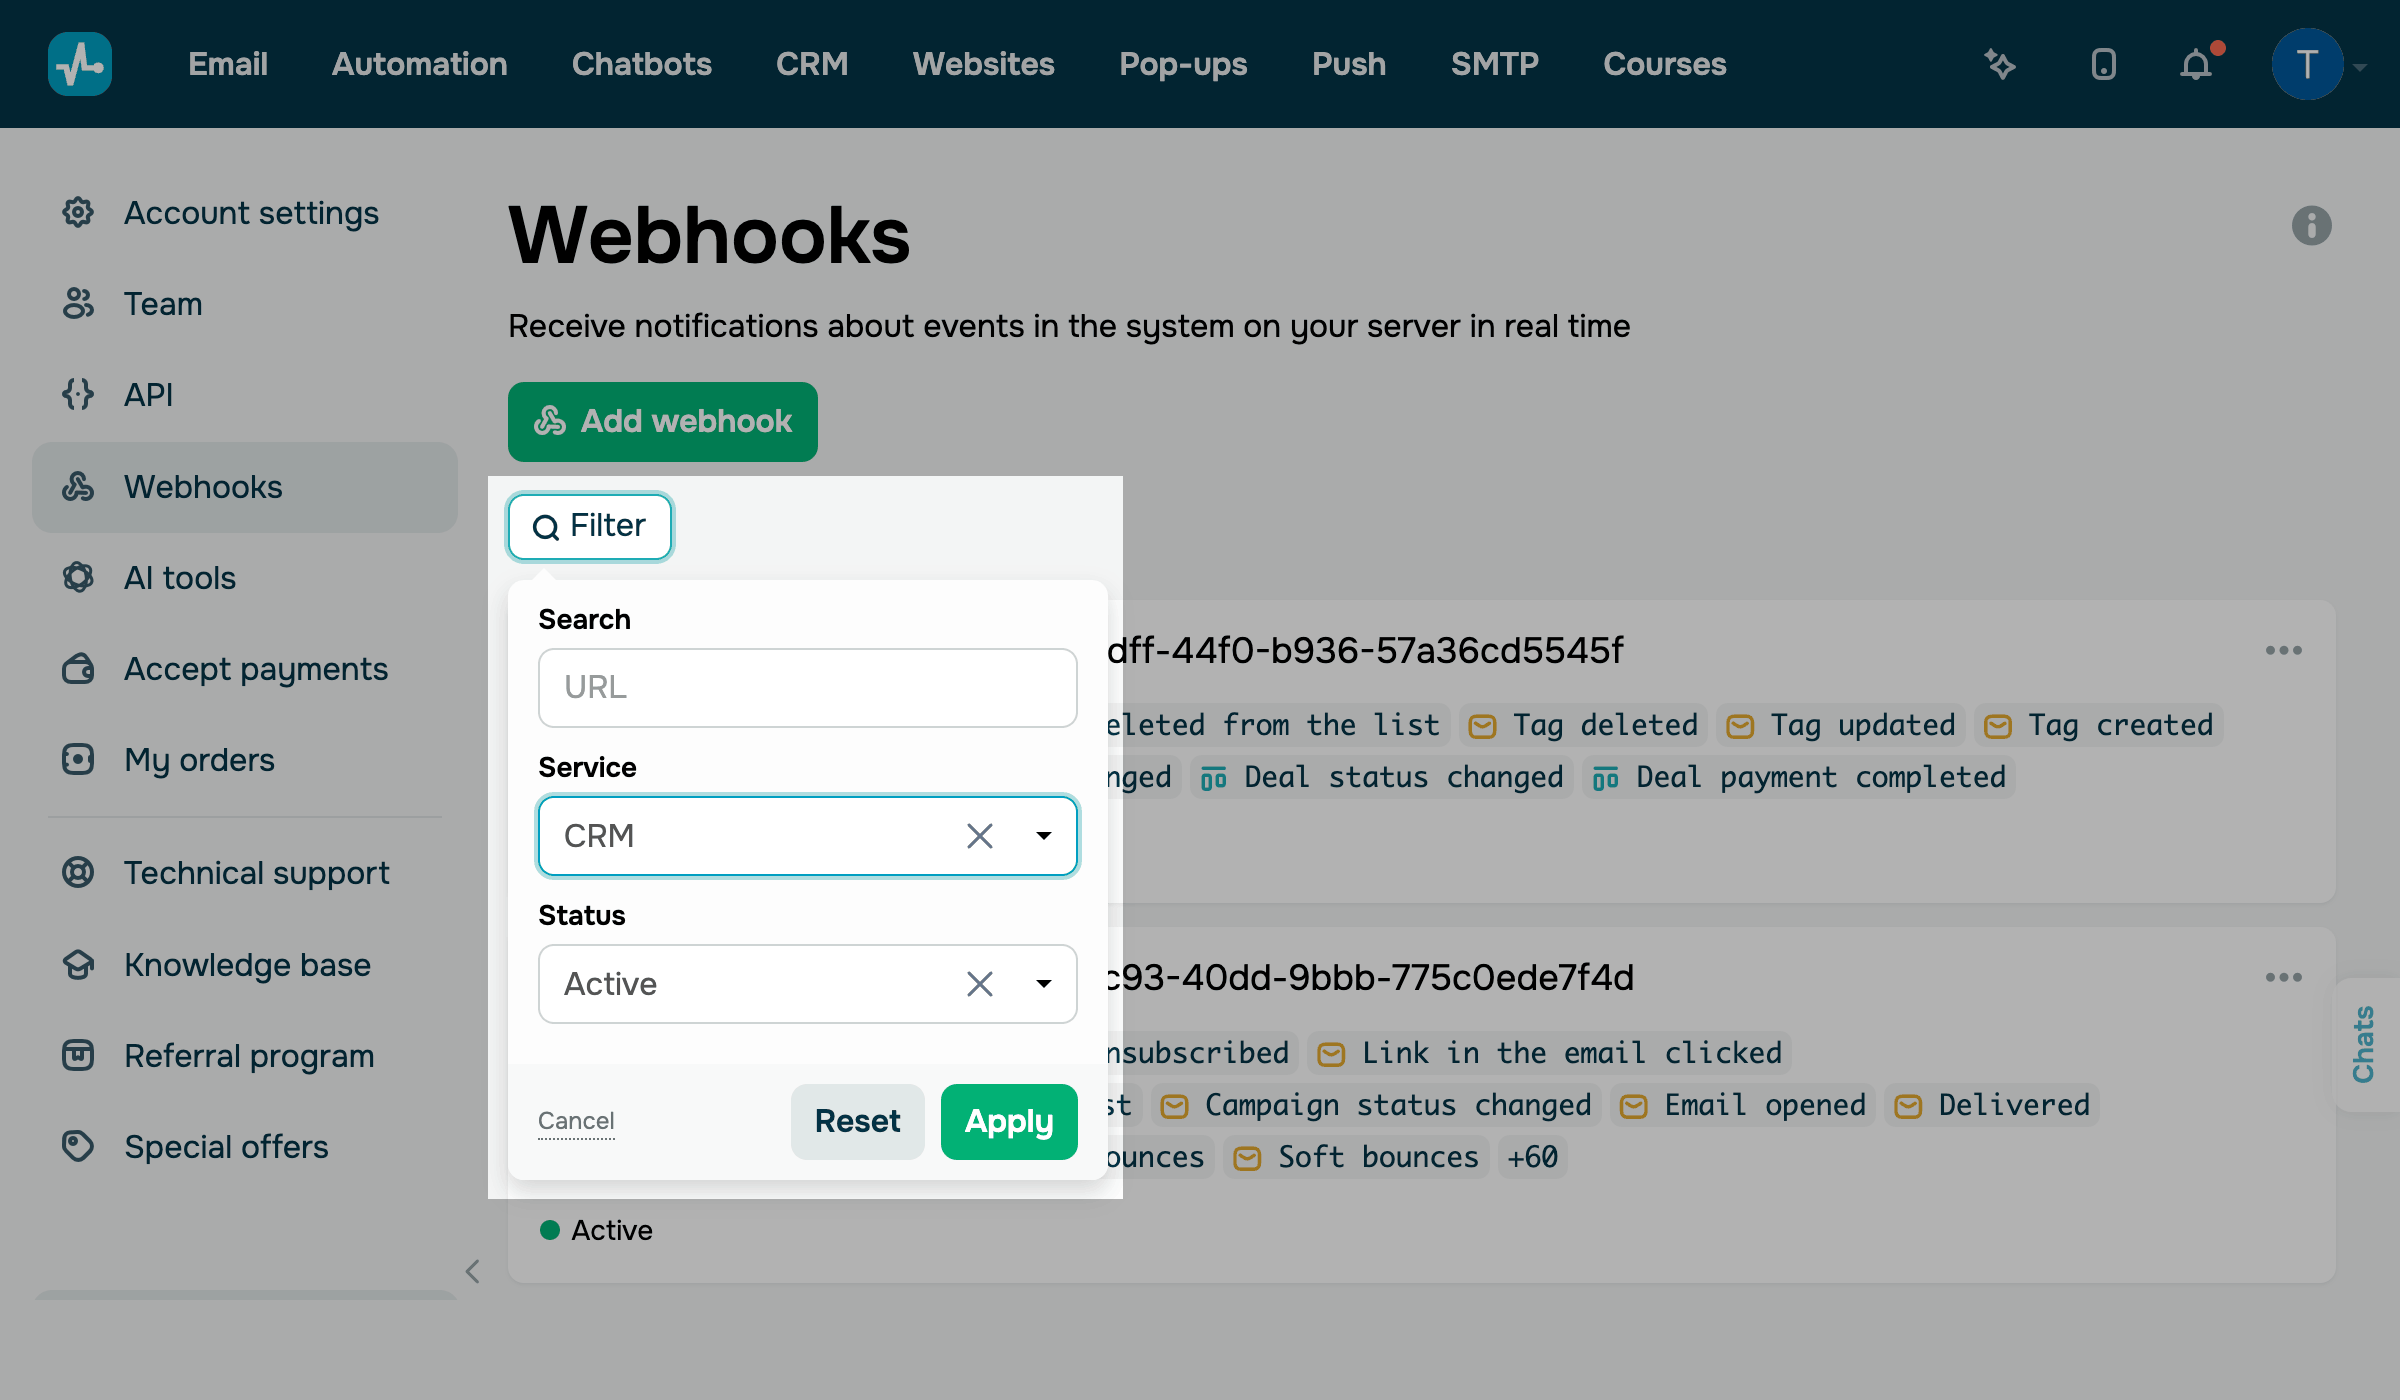
To find a webhook, click Filter. Enter part of its URL in the Search field, select a tool in the Service list, or select Active or Inactive in the Status list, and click Apply.
To show all webhooks again, click Reset.
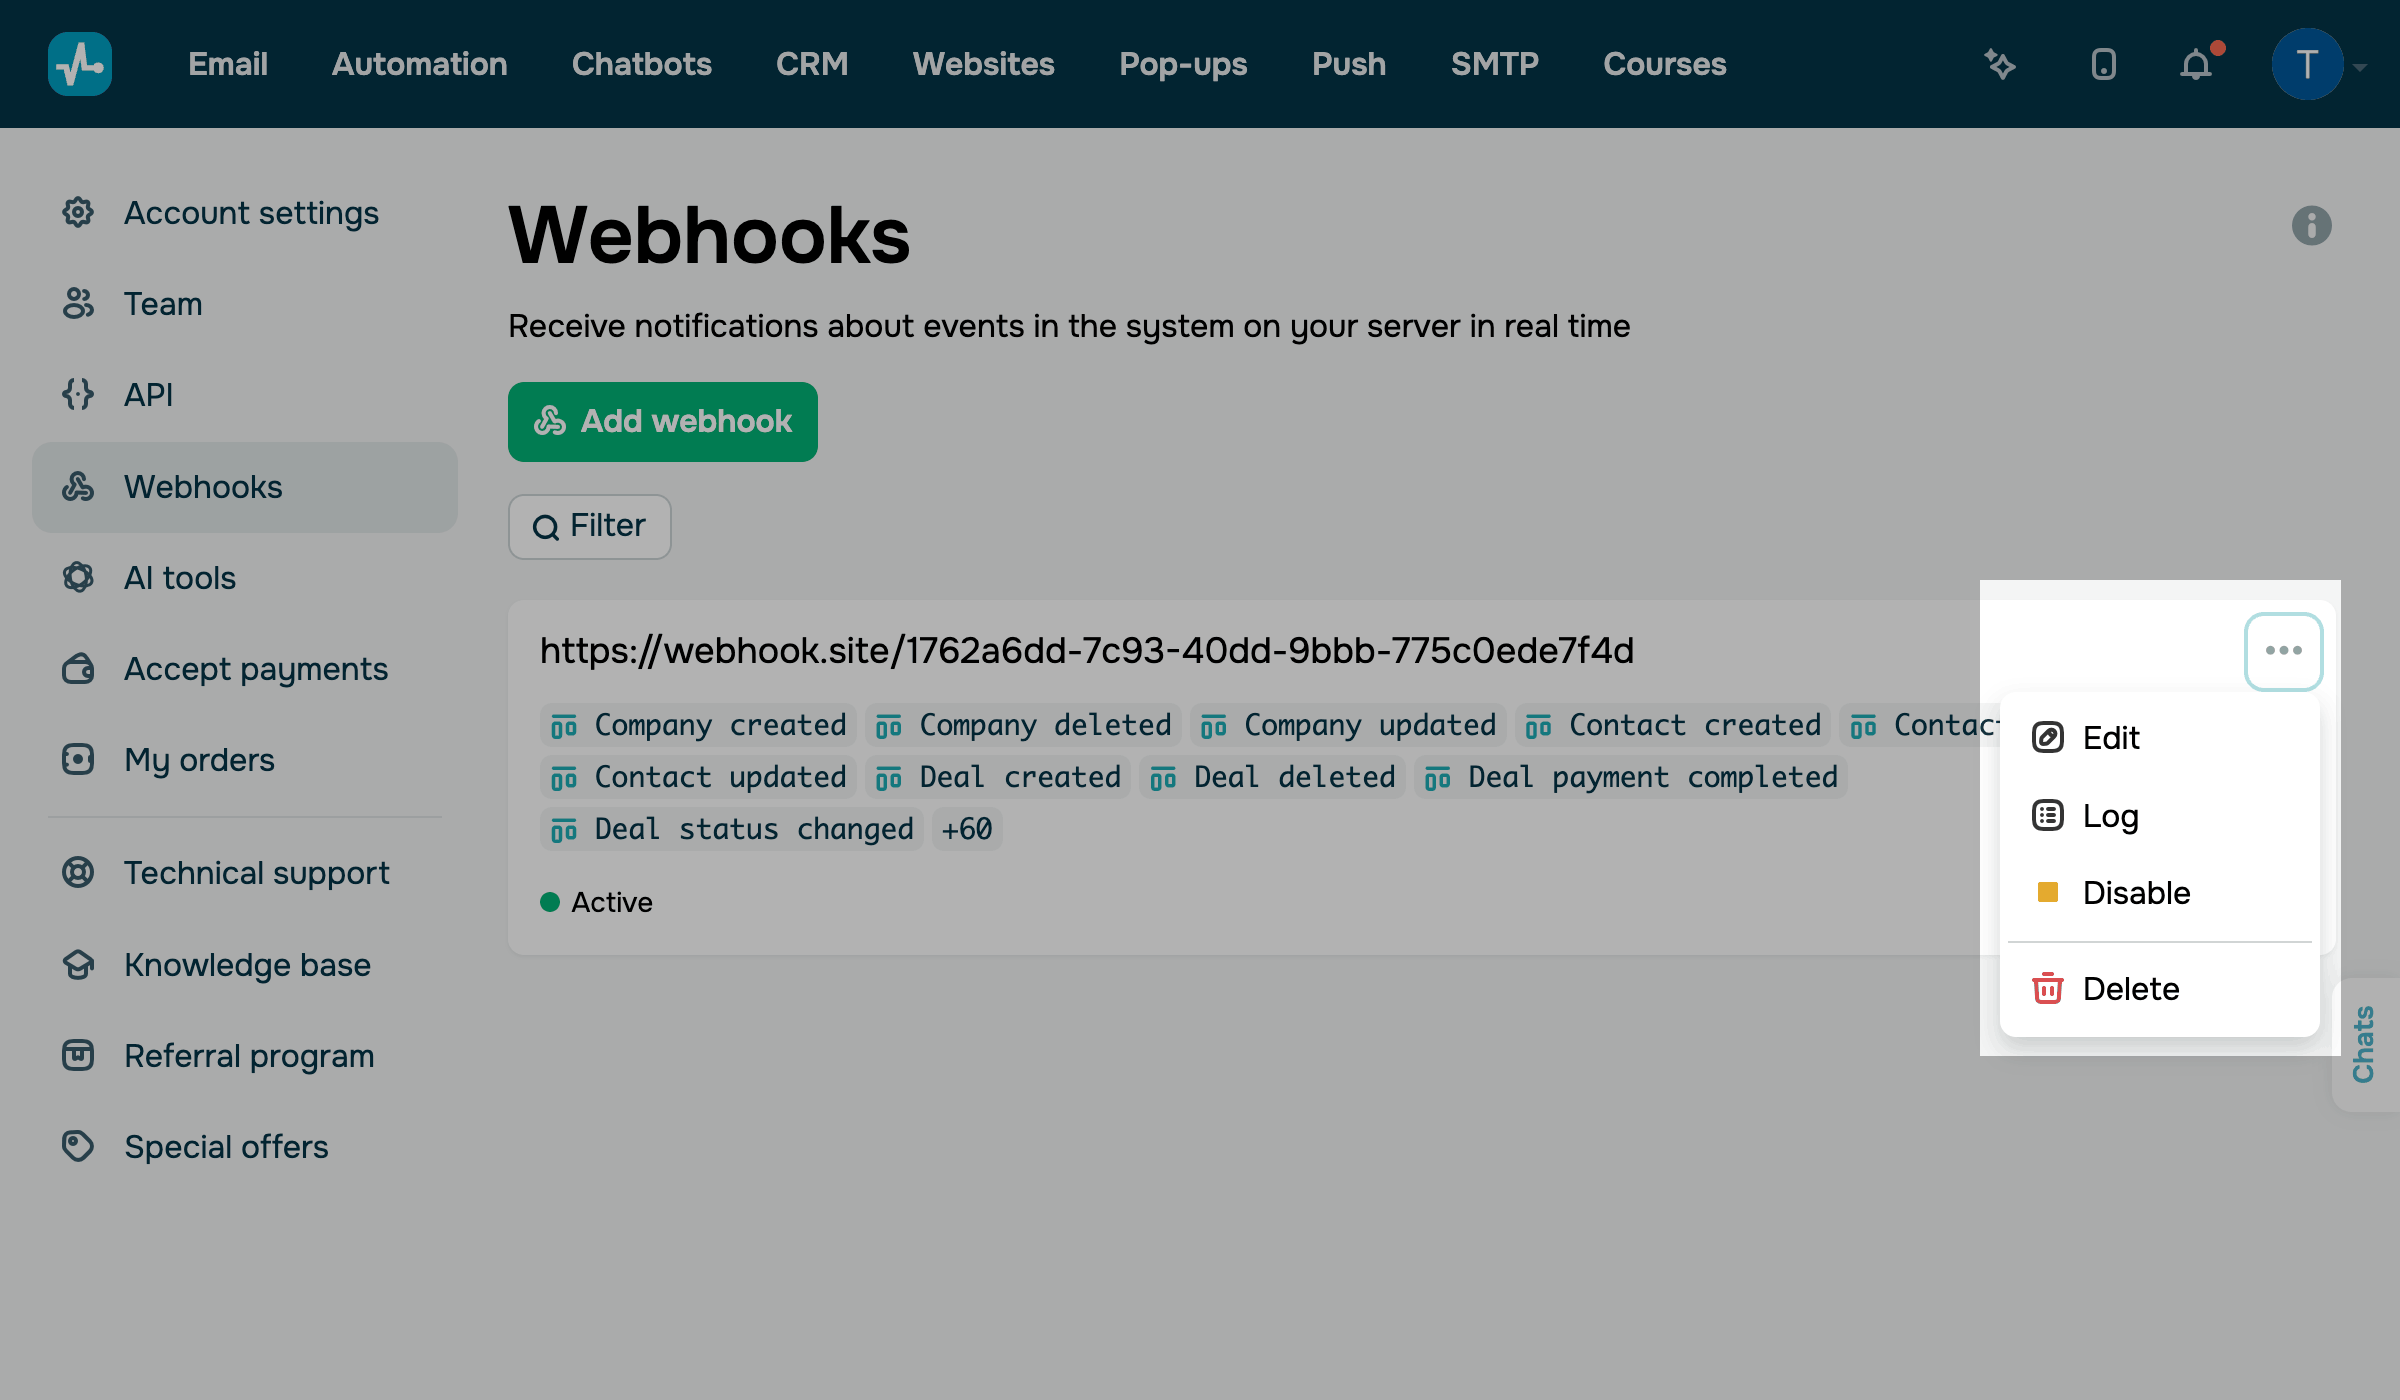
To open the actions of a webhook, click the three dots on its card. The following actions are available:
| Edit | Change the URL, headers, events, or status, view or regenerate the secret key, and send a test request. |
| Log | Open the request log of the webhook. |
| Disable |
Stop sending requests without deleting the webhook. SendPulse keeps the settings and the request log of a disabled webhook. |
| Enable | Resume sending requests. |
| Delete |
Delete the webhook permanently after you confirm the action in the dialog box. The request log of a deleted webhook isn't available. |
You can also turn the webhook on or off with the Status toggle on the Edit webhook page.
Webhooks that you created for the email service and SMTP in the former Account settings > API and webhooks section are migrated to this list automatically. You can find them by their URL. They keep working, and the requests for their events also contain the data in the previous format. For more information, see View request details.
Each event now comes as a dedicated request with a JSON object in the body, not an array. If your server expects an array of events, update your handler as described in Your handler stopped processing events after the migration.
Now your server receives event notifications from SendPulse in real time.
To check that events reach your server and see how it responds, view the request log.
Learn how to create a custom user role for team members who manage webhooks, and set up webhooks for chatbots and pop-ups.
You can also send events to no-code platforms such as Make and n8n. To create and manage webhooks from your own system, use the REST API.
 Last Updated: 03.11.2026
or